

Updating data
If your data source updates regularly — for example, new survey responses coming in each week — you can append fresh data to your Text Auto Report manually or on a recurring schedule.
Updating data manually
Section titled “Updating data manually”You can trigger a manual run at any time — for example, to pull in fresh data between scheduled runs, or if you don’t have a schedule set up.
- Open the Text Auto Report. If you’re starting from the Text Explorer home page, hover over the project row, click More (⋮), and select Text Auto Report.
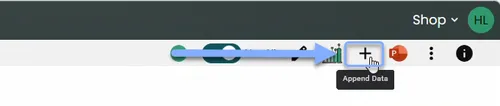
- Click the + (Append Data) button in the report toolbar.
- The Re-Run Project dialog opens. Choose how to update the data.
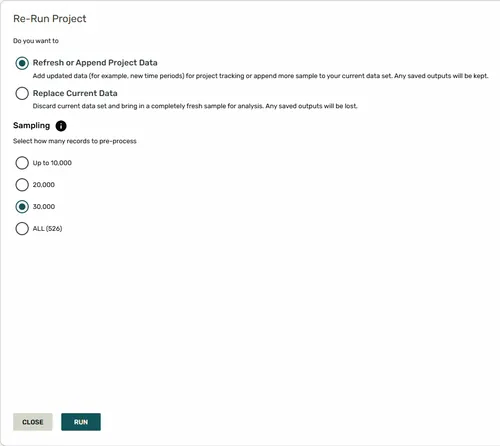
- Select a Sampling option and click Run.
Append
Section titled “Append”Refresh or Append Project Data adds new records to the existing dataset while keeping all saved chart outputs. Use this when new responses have come in since the last run and you want to incorporate them without losing current results.
For projects connected to a survey data source, an additional date filter appears:
| Option | What it includes |
|---|---|
| All From Start | All survey responses from the beginning |
| From Last Run | Only responses submitted since the project last ran |
| Custom Date | Responses from a date you specify |
From Last Run is the most common choice for regular updates.
Replace
Section titled “Replace”Replace Current Data discards the current dataset entirely and processes a fresh sample from scratch. Use this when the underlying data has been restructured, or when the previous sample is no longer representative.
Sampling
Section titled “Sampling”Both options include a Sampling setting for how many records to process:
| Option | Records processed |
|---|---|
| All | All records in the data source (or matching the date filter) |
| Up to 10,000 | A sample of up to 10,000 records |
| 20,000 | A sample of up to 20,000 records |
| 30,000 | A sample of up to 30,000 records |
For large data sources, a sample reduces preprocessing time while still producing representative results.
Scheduling Updates
Section titled “Scheduling Updates”If your data source updates regularly, you can schedule the project to rerun automatically. Each time the project runs, it pulls fresh data and the Text Auto Report reflects the updated results.
Setting up a schedule
Section titled “Setting up a schedule”You can open Manage Schedule in two ways:
From the Text Explorer home page: hover over the project row, click More (⋮), and select Manage Schedule.
From the report toolbar: click the ⋮ button in the report toolbar and select Manage Schedule.
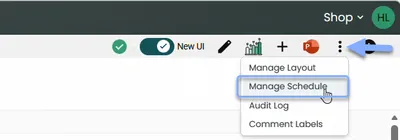
Once in Manage Schedule:
-
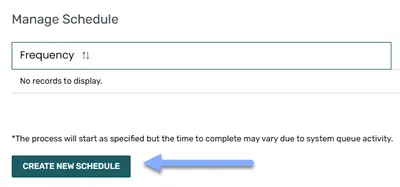
Click Create New Schedule.
-
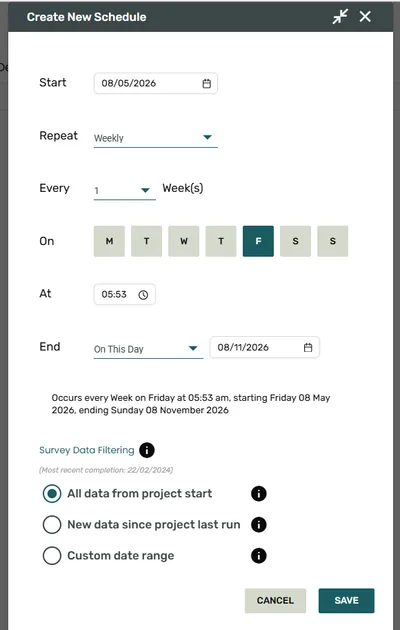
In the Create New Schedule dialog, configure the schedule:
- Start: use the date picker to set the date the schedule begins
- Repeat: select the frequency from the dropdown (weekly, monthly, or yearly)
- Every: select the interval from the dropdown
- On: click to select the day(s) of the week to run
- At: use the time picker to set the time to run
- End: use the dropdown and date picker to set when the schedule ends
-
For projects connected to a survey data source, select a Survey Data Filtering option:
- All data from project start — processes all survey responses from the beginning of the project
- New data since project last run — processes only responses submitted since the project last ran
- Custom date range — processes responses from a date range you specify
-
Click Save.
Once saved, the schedule is active. The project will run automatically at the configured time without any manual action required.
Viewing and editing a schedule
Section titled “Viewing and editing a schedule”- Open Manage Schedule from the project row or the report toolbar.
- Existing schedules are listed with their Frequency, Description, and Owner. Click Edit in the Actions column for the schedule you want to change.
- Update the settings and click Save.

Disabling a schedule
Section titled “Disabling a schedule”- Open Manage Schedule from the project row or the report toolbar.
- Click Disable in the Actions column for the schedule.

Disabling a schedule does not affect existing results — the project and its outputs remain intact. To reactivate it, open Manage Schedule and click Enable in the Actions column.
What happens during a scheduled run
Section titled “What happens during a scheduled run”When a scheduled run begins:
- The project status changes to Processing
- Fresh data is pulled from the connected data store, applying the same variable selection and any filters defined during setup
- Preprocessing and analysis run automatically
- When complete, the status returns to Success and the Text Auto Report updates
If the run fails, the project status changes to Error. Existing results from the previous successful run remain available in the report until the next successful run completes.
Frequently asked questions
Section titled “Frequently asked questions”Will I be notified when a scheduled run completes?
Notification settings depend on your account configuration. Contact your Account Manager if you want to set up email alerts for scheduled run completions or failures.
What happens to saved chart outputs when the project reruns?
Saved chart configurations are preserved, but the underlying data powering them is updated with the fresh results. Your charts will show new numbers without needing to be recreated.
Can I still run the project manually between scheduled runs?
Yes. See Updating data manually above. Manual runs do not affect the schedule — the next scheduled run will still occur at the configured time.
Can I schedule the project to run more frequently — for example, daily?
Daily scheduling is not available. The available frequencies are Weekly, Monthly, and Yearly. If you need more frequent updates, you can trigger manual runs at any time, or contact your Account Manager to discuss options.