

Create a data store
Got data in a spreadsheet or an SPSS file? Turn it into a data store and the whole platform can use it: Data Explorer for crosstabs, Text Explorer for open text, Dashboard Publisher for live reporting with a shared audience.
Creating a data store takes two moves. First you create an empty data store and give it a name. Then you fill it, either by importing a file (Data Wrangler works out the structure for you) or by adding variables one at a time.
Create the data store
Section titled “Create the data store”- Click Create Data Store - It’s at the top of the Data Wrangler home.
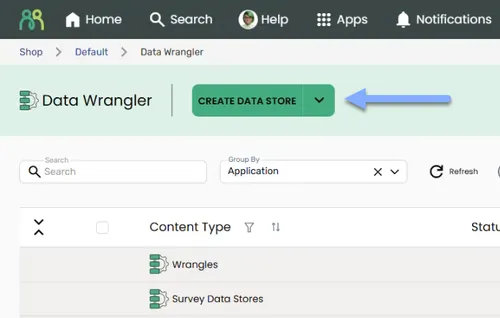
- Name it - In the New Data Store dialog, type a name in the Name field and click OK. You’ll see “Creating data store…” while it’s set up.
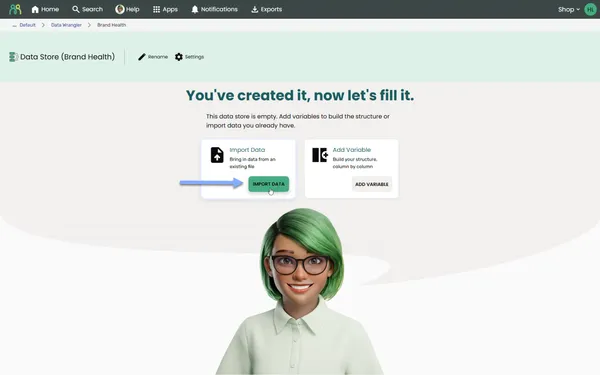
- Choose how to fill it - Your new data store opens with the message “You’ve created it, now let’s fill it.” and “This data store is empty. Add variables to build the structure or import data you already have.” There are two cards:
- Import Data: “Bring in data from an existing file”
- Add Variable: “Build your structure, column by column”
Import data from a file
Section titled “Import data from a file”Choose Import Data when your data already lives in a file, which is most of the time. A full-screen Import Data window walks you through three steps: File Upload, Variables and Output.
Step 1: File Upload
Section titled “Step 1: File Upload”- Click Import Data - Click the Import Data button on the Import Data card.
- Add your file - Drag your file onto Drop File Here, or click Browse to choose it.
- Wait for the analysis - While you see “Analysing Data …”, Data Wrangler reads every column and works out its variable type. As soon as it’s done, you’re taken straight to the Variables step.
You can import these file types:
- CSV (.csv)
- Excel (.xls, .xlsx)
- SPSS (.sav)
- ZIP (.zip), as long as it contains a .sav file
Step 2: Variables
Section titled “Step 2: Variables”Here’s the structure Data Wrangler worked out from your file: one row per column, with its Type, Variable Name and Variable Label. Take a minute to check the types before you go any further.
Data Wrangler gives each column one of five types: Text, Number, Date Time, Boolean (true/false) or Guid. If any value in a column doesn’t fit, the whole column comes in as Text.
- Whole numbers come in as Number, never Integer. That matters if you’ll recode into the variable later, because overwriting it with a Categorical Recode needs an Integer variable. You can change the type in Variable View after the import. Importing publishes the data store, though, so the owner will need to use Edit Schema first.
- Dates aren’t always recognized. See the tip below.
What you can do here, in brief. The numbers match the screenshot.
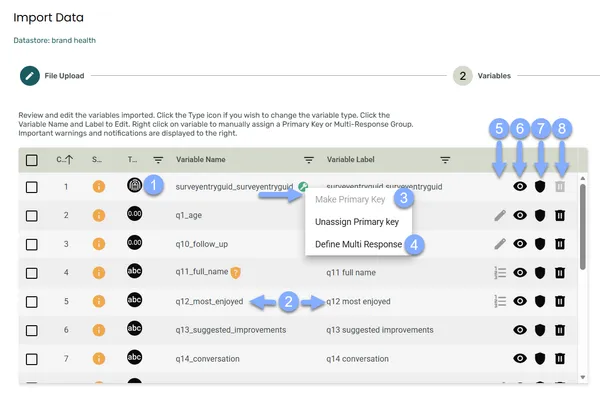
| # | To do this | Do this | Learn more |
|---|---|---|---|
| 1 | Change a variable’s type | Click the variable’s Type icon. A panel opens on the right, listing only the types that suit the data: GUID, Numeric, Text, True / False or Date Time. If you’ve ticked several variables, the change applies to all of them. | Manage variables |
| 2 | Edit a name or label | Click the Variable Name or Variable Label | Manage variables |
| 3 | Set the primary key | Right-click the variable and choose Make Primary Key | Keys, codeframes & multi-response |
| 4 | Group variables into a multi-response question | Tick two or more variables, right-click and choose Define Multi Response | Keys, codeframes & multi-response |
| 5 | Add or edit a codeframe | Click the codeframe icon (“Suitable for Codeframe. Click to add.” or “Existing Codeframe. Click to edit.”). A text box opens: “Please enter your code in the format: [code] [label].” Enter one code and label per line, then click Save. | Keys, codeframes & multi-response |
| 6 | Check a variable’s values | Click the Preview Data icon | — |
| 7 | Protect personal information | Click the Handle personal information icon | Personal information |
| 8 | Leave a column out | Click the Delete icon, then confirm in Remove Variable. This removes the column’s data from the upload, not from your file. | — |
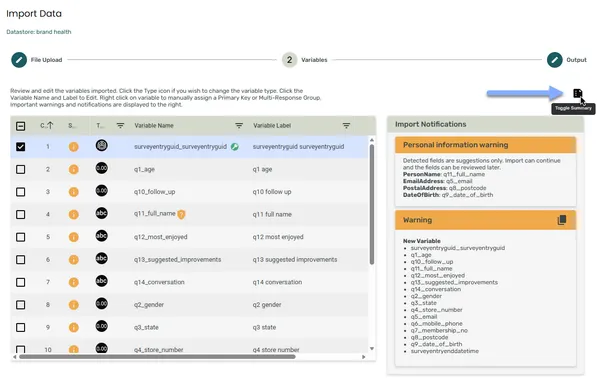
Warnings and errors appear in the Import Notifications panel on the right. You can move on once there are no errors. While a type, codeframe or personal-information panel is open, it takes the place of Import Notifications. To bring the notifications back, click the Toggle Summary icon above the table.
A few things Data Wrangler does for you:
- Primary key: it sets the first column whose values are all unique and all filled in as the primary key. You can change this before you continue.
- Personal information: it flags columns that might hold personal information, under Personal information warning. These are suggestions only. You can carry on and review them later.
Step 3: Output
Section titled “Step 3: Output”The last step shows a preview of your data: “Preview your data before committing the upload. If you need to make changes to any of the variables’ configuration, hit Back.” If your data has codeframes, use the View Labels toggle to see labels instead of codes.
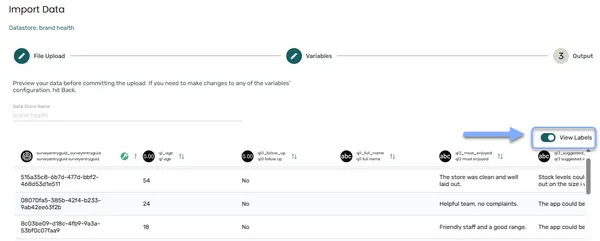
The Data Store Name shows the name you gave in the New Data Store dialog. You can’t change it here; use Rename on the data store page later if you need to.
- Click Done - A progress bar appears: “Do not close this page while the datastore is being created. You can open another tab and continue to work.”
- Wait for the result - When it’s finished you’ll see “Process Complete. Your file has successfully loaded and your datastore is ready.” Click OK to close the dialog.
- Click Close - You’re back on your data store, now full of data.
Build a data store column by column
Section titled “Build a data store column by column”Choose Add Variable when you want to design the structure before you have any data, or when you’ll fill the data store later.
- Click Add Variable - Click the Add Variable button on the Add Variable card. The data store switches to Variable View and opens the Add Variable dialog.
- Choose Blank Variable - Click Blank Variable, then SELECT. (Recode and Compute stay locked until the data store has a variable they can use.)
- Add your variables - Add each variable with its name, label and type. See Manage variables.
What’s next
Section titled “What’s next”- Check it’s published. If you imported a file, your data store is published automatically when the import finishes, ready for other apps to use. If you built it with Add Variable, it stays in Draft until you publish it. See Publish & manage a data store.
- Look around your data in Data View.
- Add more data later. See Update data.
Frequently Asked Questions
Section titled “Frequently Asked Questions”Why are the Import Data and Add Variable cards locked?
You need to be the data store’s Owner, or have Can Edit access, to fill it. Ask the owner to give you Can Edit access. See Share content.
What if my file doesn’t have a primary key?
You can still import it. Data Wrangler sets the first column whose values are all unique and all filled in as the primary key. If no column qualifies, Import Notifications tells you: “Your data does not contain a Primary Key. To add one or more, right mouse click on the variable. Otherwise press ‘next’.” Click next to import without one.
We recommend including a primary key, such as a respondent ID or an order number, because Data Wrangler uses it to tell records apart. Without one:
- You can’t update records later. Update Data and Insert and Update need a primary key to match incoming rows to existing records. Without one, every row you import is added as a new record, so importing a corrected file creates duplicates. See Update data.
- Some apps can’t use the data store. Case Manager, Text Explorer and Action Connect need a primary key to work with a data store’s records.
- Adding one later takes more steps. Importing publishes the data store, and publishing locks the primary key. The owner would need to use Edit Schema first.
To choose a key yourself, right-click a variable and choose Make Primary Key. A primary key must be 100% unique and 100% filled in. If no single column qualifies, you can select several columns to make a combined key. See Keys, codeframes & multi-response.
Why can’t I remove a variable?
Primary key columns can’t be removed: you’ll see “Primary key columns cannot be removed”. Unassign, then make a different column the primary key first, or leave the column in.
Why can’t I move past the Variables step?
There’s at least one error in the Import Notifications panel, such as duplicate variable names or a primary key with blank or repeated values. Fix each error and you’ll be able to continue.
I went back to the File Upload step and my file disappeared. Why?
Going back to File Upload clears the file so you can choose a different one. Upload it again to carry on.
How do I add more data later?
Once your data store has data in it, use Import Data in the data store’s header, or More → Update Existing Data on the Data Wrangler home. See Update data.
Common Issues and Solutions
Section titled “Common Issues and Solutions””Uploading of .zip files is only supported when it contains a .sav file.”
Section titled “”Uploading of .zip files is only supported when it contains a .sav file.””Data Wrangler only accepts ZIP files as a wrapper for SPSS data.
- Check what’s inside - Make sure the ZIP contains a .sav file.
- Upload other files directly - CSV and Excel files don’t need zipping. Upload them as they are.
”Uploading of file has failed.”
Section titled “”Uploading of file has failed.””Your .sav or .zip file couldn’t be converted.
- Check the file opens - Open it in SPSS to check it isn’t damaged.
- Try again - Upload it once more.
- Contact support - If it keeps failing, contact support through Help in the header bar. Include the data store’s name and GUID (copy it from Settings).
”The combination key is not unique, please check again.”
Section titled “”The combination key is not unique, please check again.””The variables you chose as the primary key don’t uniquely identify every row.
- Pick a different key - Choose a column, or combination of columns, where every row has a different value.
- Or fix the file - Remove the duplicate rows from your file and upload it again.
”Duplicate variable names are not allowed.”
Section titled “”Duplicate variable names are not allowed.””Two variables have the same name.
- Rename one - Click the Variable Name of one of them and give it a different name.
”Primary key values must be unique.” or “Primary key fields (single or composite) are mandatory.”
Section titled “”Primary key values must be unique.” or “Primary key fields (single or composite) are mandatory.””The primary key has repeated values, or some rows have no value in it.
- Choose another key - Right-click a different variable and choose Make Primary Key.
- Or fix the file - Fill in the blanks or remove duplicates, then upload the file again.
”The code key is not a number, please try again.”
Section titled “”The code key is not a number, please try again.””Codes in a codeframe must be numbers.
- Fix the code - Change each code to a number, then save the codeframe.
”Process Failed. Your file could not be processed.” or “The file import for this data store failed. Please check your data and try again.”
Section titled “”Process Failed. Your file could not be processed.” or “The file import for this data store failed. Please check your data and try again.””The upload was accepted, but the data couldn’t be loaded.
- Check your file - Look for problems such as empty rows above the headers, merged cells, or data that isn’t on the first worksheet.
- Try again - Import the corrected file.
- Contact support - If it keeps failing, contact support with the data store’s name and GUID (copy it from Settings), and when you ran the import.
”The upload of data store … has failed. Our support team has been notified.”
Section titled “”The upload of data store … has failed. Our support team has been notified.””The import couldn’t be submitted. The message may include a reference, such as “Import Request: …”.
- Copy the reference - Note the Import Request reference if there is one.
- Contact support - Use the contact us link in the message. Quote the reference, and the data store’s name and GUID (copy it from Settings).