

Finding and organizing content
The content table on your Portal home is your command center for all HumanListening content - surveys, dashboards, text projects, Data Explorer workspaces, and more. Instead of hunting through individual applications, everything you have access to appears in one organized view where you can search, filter, group, tag, and pin to find exactly what you need.
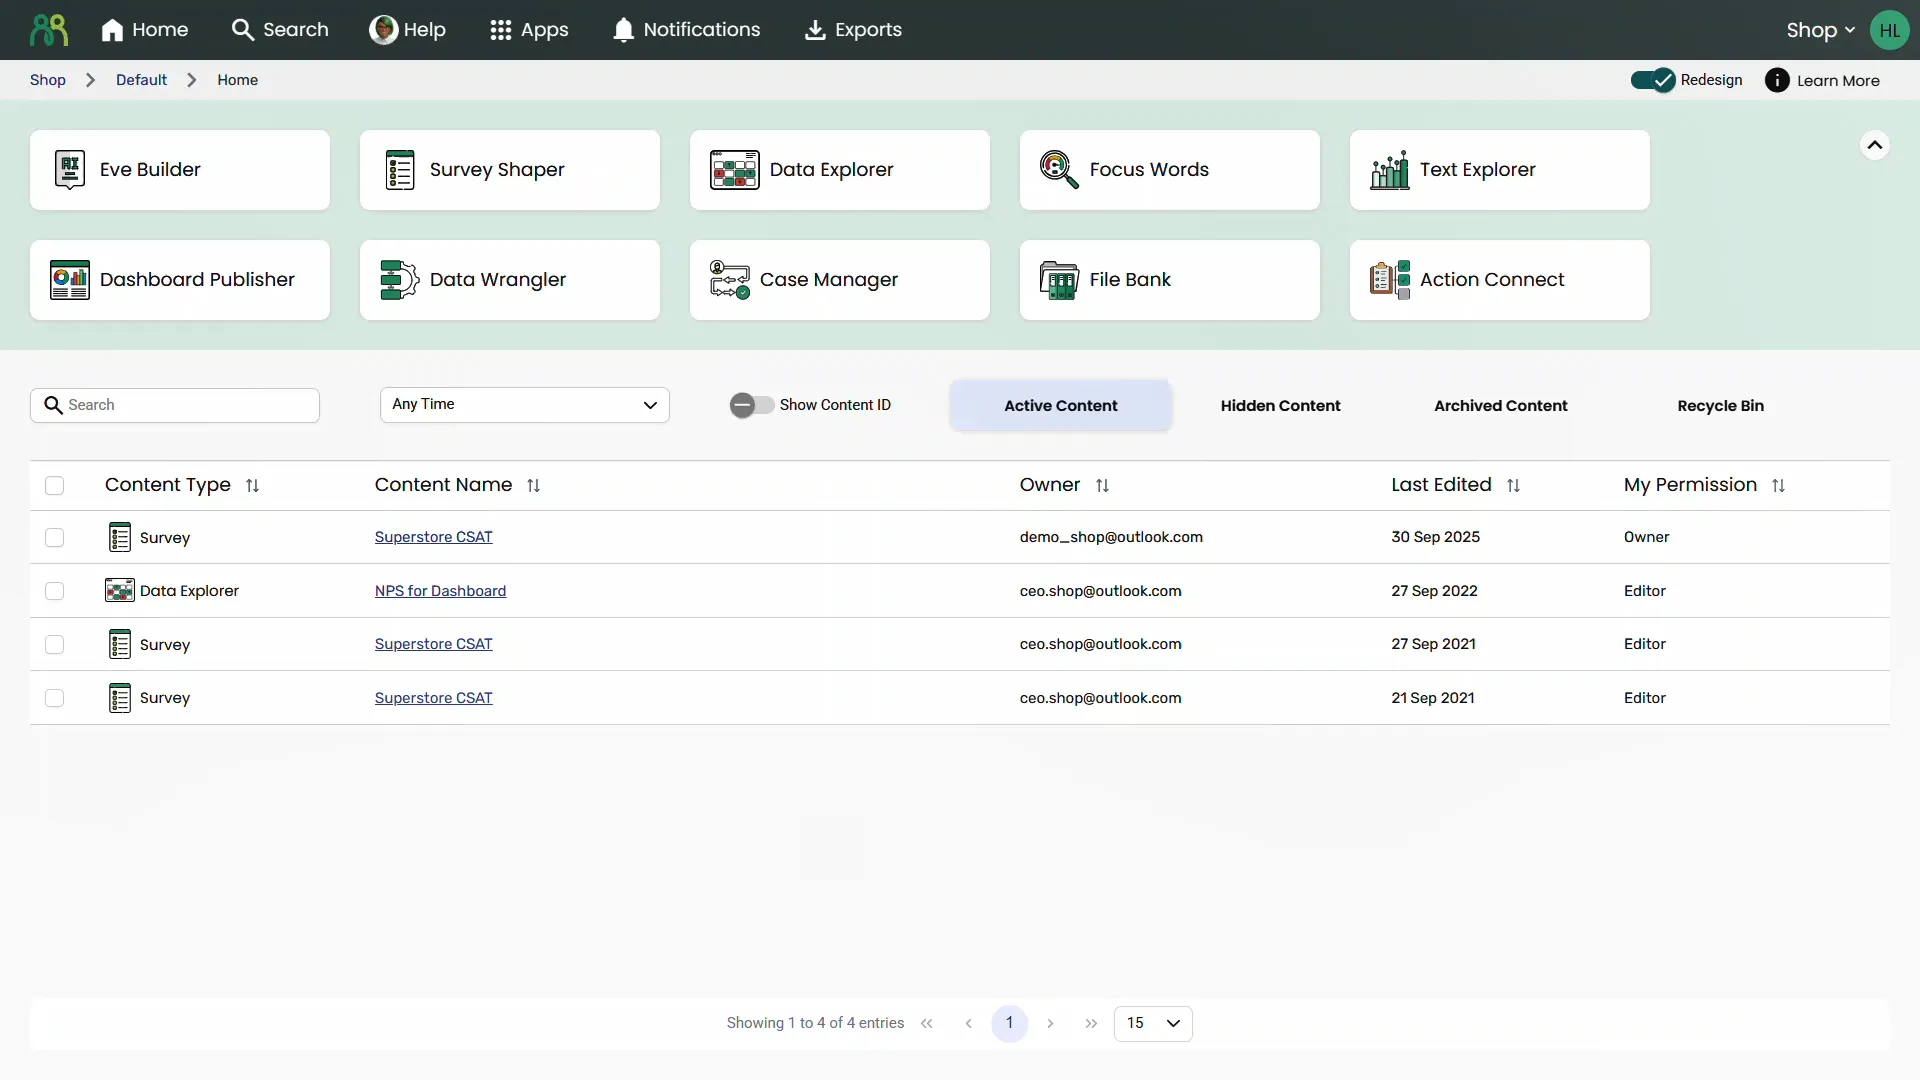
What you can do:
- Search across all your content instantly
- Filter by content type, when content was last edited, or status (active, hidden, archived, deleted)
- Group content by application or custom tag categories
- Pin important items for quick access
- Apply tags for flexible organization
- Sort by any column to find content fast
- Take bulk actions on multiple items at once
This page covers all the tools you need to transform a potentially overwhelming list of content into a well-organized workspace that matches how you actually work.
Searching content
Section titled “Searching content”Global search
Section titled “Global search”The global search helps you find content by name across all applications and all accounts and sub accounts you have access to.
Finding content
Section titled “Finding content”- Click Search in the portal header
- Type part of the content name - results appear as you type, each showing the account and sub account it belongs to
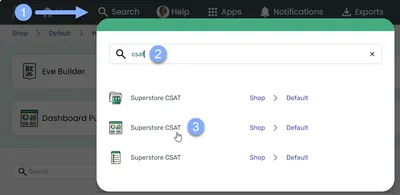
If nothing matches, you’ll see No results found for “your search”.
Recently viewed
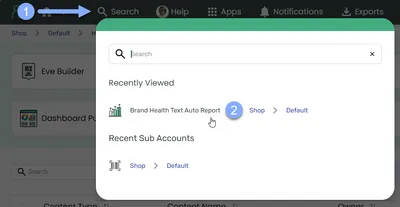
Section titled “Recently viewed”When the search box is empty, global search shows two lists you can jump back to:
- Recently Viewed - places in the Portal you’ve opened recently
- Recent Sub Accounts - sub accounts you’ve visited recently
Your history keeps up to 10 entries and is saved in your current browser, so it won’t follow you to another device.
Content table search
Section titled “Content table search”Use the Search box above the content table to find specific content. This is separate from the global search in the header - it filters only the table you’re looking at, in real time as you type.
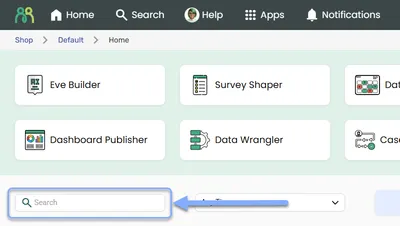
What you can search for:
- Content names (full or partial)
- Owner email addresses
- Content type names (for example “Survey” or “Dashboard”)
- Tag codes and tag category names
- Content GUIDs (if you have one)
- Last edited dates, in the format shown in the table (for example “27 Sep 2025”)
Clear the search box to see all content again.
Sorting content
Section titled “Sorting content”Sorting defaults to most recent, so your newest work is always at the top. Click any column header to sort your content. The sorted column is highlighted and shows an arrow indicating whether it’s sorted ascending or descending. Click the same header again to flip the sort direction.
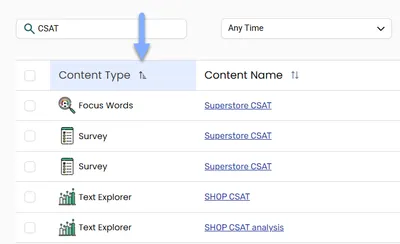
Available sort options:
- Content Type - by content type
- Content Name - alphabetical
- Owner - alphabetical by owner email
- Last Edited - chronological (newest or oldest first)
- My Permission - alphabetical by permission
Sorting works within grouped sections - if you’ve grouped by application or tags, the sort order applies within each group rather than across the entire table.
Pages and saved settings
Section titled “Pages and saved settings”- Use the controls at the bottom of the table to move between pages and choose to show 15, 25, or 50 rows per page.
- The table remembers your sort order, filters, and expanded groups for each sub account, so it looks the same when you come back. These settings are saved in your current browser.
Refreshing the table
Section titled “Refreshing the table”Click Refresh above the table to reload your content from the server. This is useful if someone has just shared something with you or you’ve made changes in another tab and they’re not showing yet.
Filtering content
Section titled “Filtering content”Use filters to narrow down your content table to specific types or time periods. Filters work together with search and grouping to help you find exactly what you need.
Content type filter
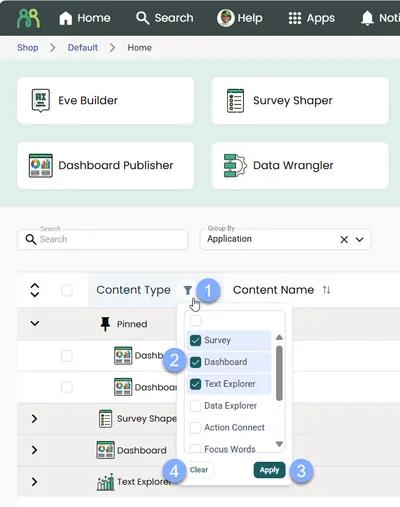
Section titled “Content type filter”Click the filter icon in the Content Type column header to filter by specific content types.
- Click the filter icon next to “Content Type” in the table header
- Select one or more content types from the list - only types you actually have content for are listed (for example Survey, Dashboard, Text Explorer, Data Explorer)
- Click “Apply” to filter the table
- Click “Clear” to remove all content type filters
Time period filter
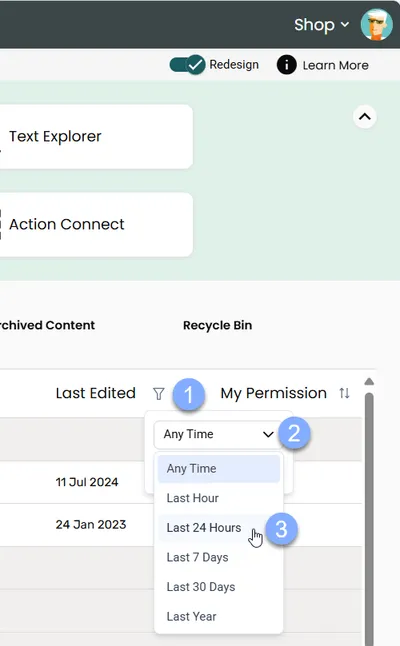
Section titled “Time period filter”Click the filter icon in the Last Edited column header to filter by when content was last modified.
- Click the filter icon next to “Last Edited” in the table header
- Select a time period from the dropdown:
- Any Time
- Last Hour
- Last 24 Hours
- Last 7 Days
- Last 30 Days
- Last Year
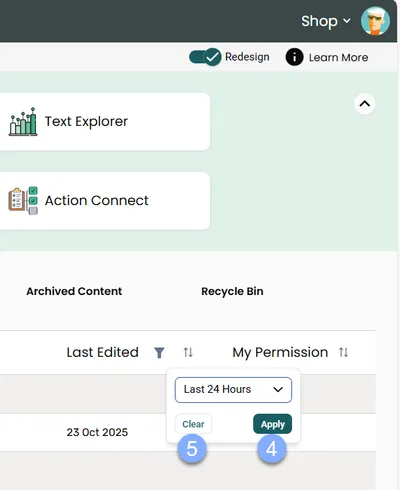
- Click “Apply” to filter the table - the solid filter icon tells you that a filter is being applied to the table
- Click “Clear” to remove the time filter
Working with filters
Section titled “Working with filters”Combining filters:
- Both filters work together to narrow your results
- Apply both content type and time period filters for very specific views
- Active filters show in the column headers - the filter icon becomes solid when a filter is active
- To remove an active filter, click the solid filter icon again and click “Clear” in the dropdown
- Clear individual filters using their respective Clear buttons, or remove all filters to see your full content table
Status tabs
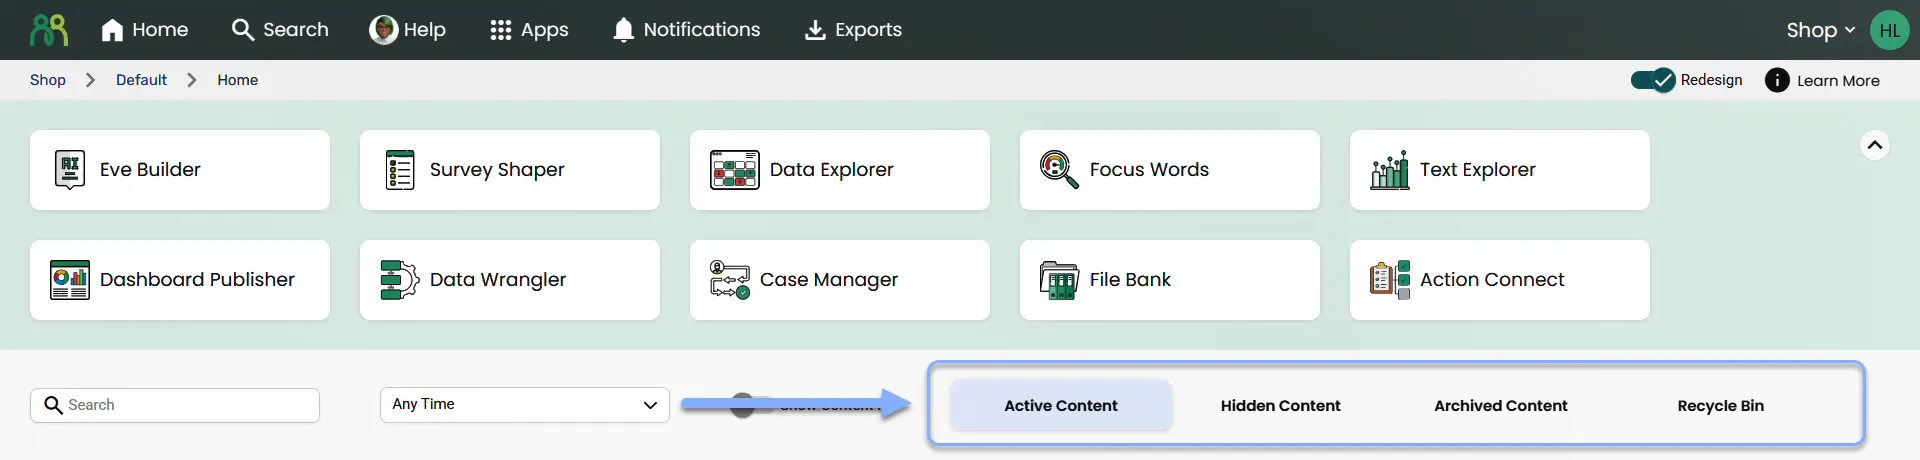
Section titled “Status tabs”Filter content by status using the tabs above the content table. Hover over a tab to see a short description.
- Active Content: Content currently in use
- Hidden Content: Content you’ve hidden from your main view - others still see it as active
- Archived Content: Finished projects you want to keep but not see daily
- Recycle Bin: Recently deleted content - it stays here for 30 days, so you can restore it
Moving content between tabs:
- Hide / Unhide - affects only your view. Anyone can hide content they can see.
- Archive / Unarchive - affects everyone. You need edit access.
- Delete - moves content to the Recycle Bin for everyone. Only the content owner can delete.
- Restore - in the Recycle Bin, returns deleted content to where it was. You need edit access.
- Permanently Delete - in the Recycle Bin, removes content straight away instead of waiting 30 days. Only the owner can do this, and you’ll be asked to confirm. This can’t be undone.
You’ll find these in the row’s More menu, or in the bulk actions panel when you’ve selected several items (see Content actions).
Show Content ID
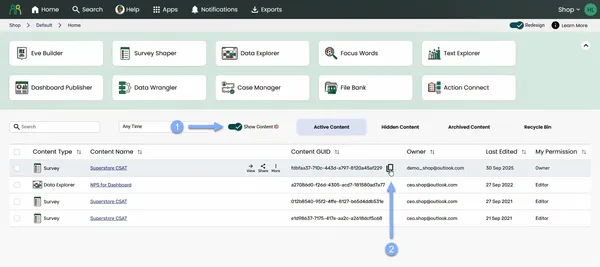
Section titled “Show Content ID”Use the Show Content ID toggle above the table to show or hide the Content GUID column. This lets you access unique identifiers for your Portal content when needed, while keeping your table clean and uncluttered during regular work. The Portal remembers your choice.
- Toggle the display - Show or hide the Content GUID column as needed
- Copy GUIDs - Click the copy icon next to any GUID when visible (you can copy owner email addresses the same way)
- Use the identifiers - Share with support teams or use in technical work
Content actions
Section titled “Content actions”Hover over any row to see its actions: View, Share, Tag, Pin (or Unpin), and More. The More menu shows only the options that apply to that item and your permissions, including:
- Rename - rename the item, including surveys, dashboards, Text Explorer projects, EVE conversations, and Data Explorer workspaces (you need edit access)
- Duplicate - make a copy of the item, for supported content types
- Edit - open the item for editing
- Hide / Unhide, Archive / Unarchive, Delete, Restore, and Permanently Delete - see Status tabs
- Export Data and View Data - for content with data, if you have data access
- Subscribe / Unsubscribe and Notification preferences - choose whether you get notifications about the item
Bulk actions
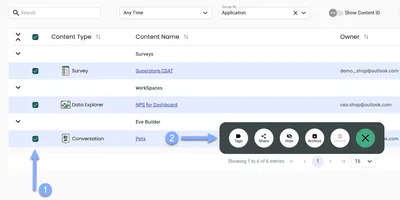
Section titled “Bulk actions”Select two or more items using the checkboxes on the left of each row, and a bulk actions panel appears. The actions depend on the tab you’re on:
| Tab | Bulk actions |
|---|---|
| Active Content | Delete, Archive, Hide, Share, Tags |
| Hidden Content | Delete, Unhide |
| Archived Content | Delete, Unarchive |
| Recycle Bin | Restore |
An action is greyed out if you don’t have permission for every selected item - for example, Delete needs you to own all of them. Share isn’t available when the selection includes dashboards. Close the panel with the X to clear your selection.
Tagging content
Section titled “Tagging content”Tags are custom labels that help you organize content across all applications. While admins create the tag categories (like Job Number, Country, Content Type), any user can apply tags to content they have access to. Admin-only creation keeps your tag structure clean and consistent - preventing tag sprawl where everyone creates slightly different versions of the same thing. Think of tags as flexible color-coded stickers you can attach to any content to group related work together.
Why use tags
Section titled “Why use tags”- Find related content instantly - All dashboards, surveys, and projects for client X in one view
- Search by tag - Type a tag code or category name to filter your entire content table
- Group by tag category - Organize your Portal home by client, project, region, or any custom category
- Cross-application organization - Tag a survey, dashboard, and text project with the same job number
Applying tags to individual items
Section titled “Applying tags to individual items”- Hover over the content row in the content table
- Click Tag in the actions that appear
- Select tags in the Apply Content Tags dialog - tags are organized by category, you can select more than one, and you can use Search to find a tag
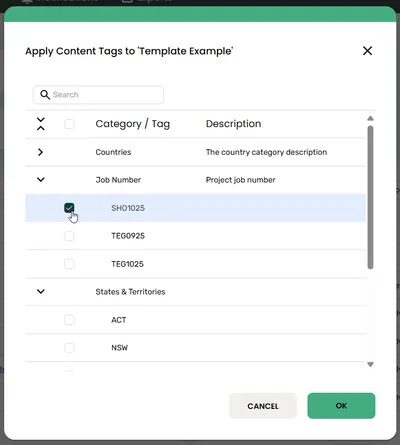
- Click OK to save your tag selections
Tagging isn’t available for archived or deleted content. If no tag categories have been set up yet, you’ll see a No Tags Available message - ask your admin to create some.
Bulk tagging multiple items
Section titled “Bulk tagging multiple items”Save time by tagging many content items at once - the fastest way to organize existing content:
- Select two or more content items using the checkboxes on the left side of each row (on the Active Content tab)
- Click Tags in the bulk actions panel
- Select tags - organized by category, you can select more than one
- Click OK to apply your tags to all selected items at once
If a tag is already on some of the selected items but not all, its checkbox shows as partly selected. Leave it as it is to keep each item’s current state, tick it to add the tag to all selected items, or untick it to remove it from all of them.
Removing tags
Section titled “Removing tags”From individual items:
- Hover over the content row and click Tag
- Deselect tags you want to remove
- Click OK to save changes
From multiple items at once:
- Select content items using checkboxes
- Click Tags in the bulk actions panel
- Deselect tags you want to remove
- Click OK to update all selected items
Tags in search
Section titled “Tags in search”The search treats tags just like content names - no special syntax needed. You can type a tag code (like “Australia”) or a category name (like “Country”) to see everything tagged in it. Combine with other filters for very specific views (e.g., “Australia” + “Last 30 Days”).
Grouping content
Section titled “Grouping content”By default, content is grouped by application (Survey Shaper, Dashboard Publisher, Text Explorer, etc.), organizing your work into distinct sections. But you can switch to group by tags instead - custom categories your admin team creates to organize content by client, project, region, or whatever makes sense for your workflow.
How grouping works
Section titled “How grouping works”- Look for the “Group By” dropdown in the content table controls
- Click the dropdown to see available grouping options - you can type to filter the list
- Select a grouping option:
- Application (default) - groups by Survey Shaper, EVE Builder, Text Explorer, etc.
- Tag categories (if tags have been created) - groups by any custom tag category like Job Number, Country, Project Type, etc.
- To remove grouping: Click the X in the Group By dropdown to return to an ungrouped, flat list view.
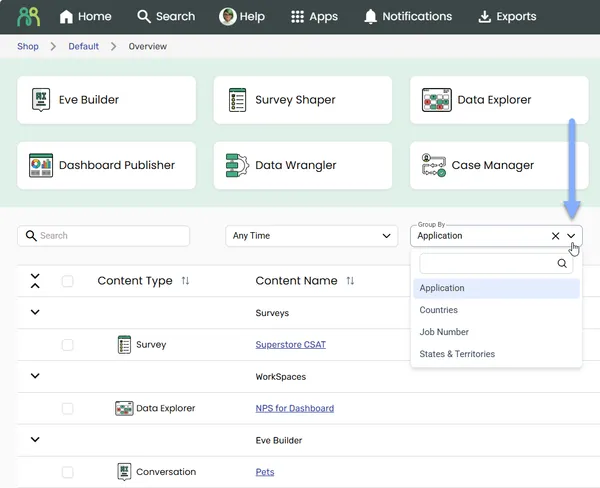
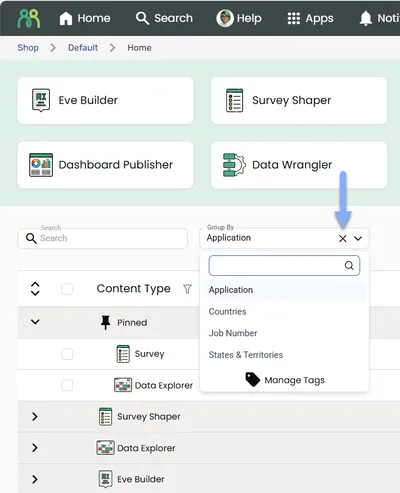
When you’re grouped by a tag category, each group heading also has an X. Clicking it takes you back to grouping by Application.
Understanding the grouped view
Section titled “Understanding the grouped view”When you group content, the table reorganizes into collapsible sections:
- When grouped by application, each section header shows the application name. Click the name (or View) to open that application.
- When grouped by tags, each section header shows the category and tag, for example “Country: Australia”
- Click the chevron icon next to any section header to expand/collapse it
- Use the Expand All / Collapse All button in the table header to open or close every section at once - the button switches between the two
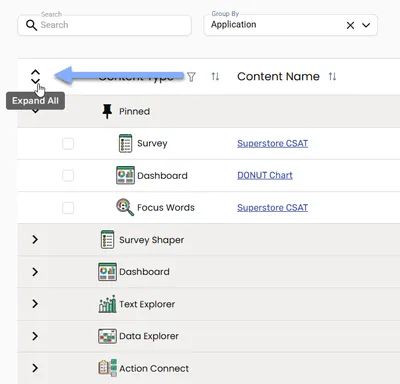
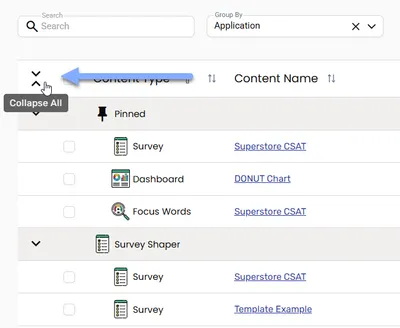
- Content within each section maintains your selected sorting (most recent, alphabetical, etc.)
Working with grouped content:
- Search and filters work across all groups
- You can select and bulk-action items across multiple groups
- Collapse sections you’re not interested in to focus on specific work
Pinning content
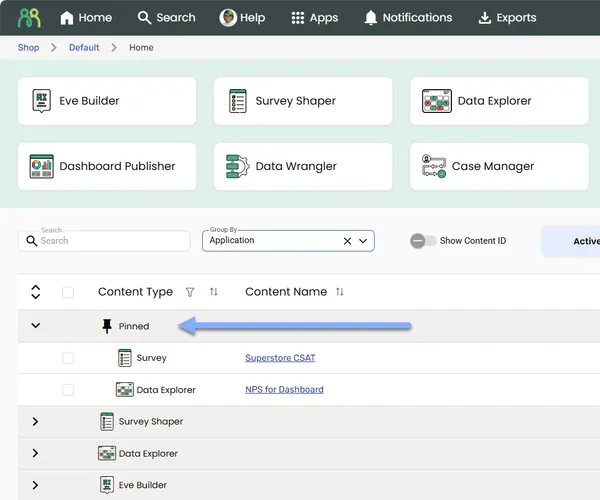
Section titled “Pinning content”Keep your most important content front and center by pinning it to the top of your content table. Pinned items stay visible regardless of sorting or how much new content gets created - perfect for dashboards you check daily, active surveys, or projects you’re currently working on.
How pinning works
Section titled “How pinning works”Pinned section behavior:
- Pinned items appear in a dedicated “Pinned” section at the very top of your content table
- This section sits above all application or tag groups
- The pinned section is collapsible (just like other groups) but is expanded by default
- Pinned items are duplicated - they appear both in the Pinned section AND in their relevant group
Your pins are personal:
- Pin state is yours alone - your pinned items don’t affect what other users see
- Pins persist across sessions, so your pinned content stays put when you log back in
Pinning content items
Section titled “Pinning content items”- Hover over any content row in the content table
- Click Pin in the actions that appear (look for the pin icon)
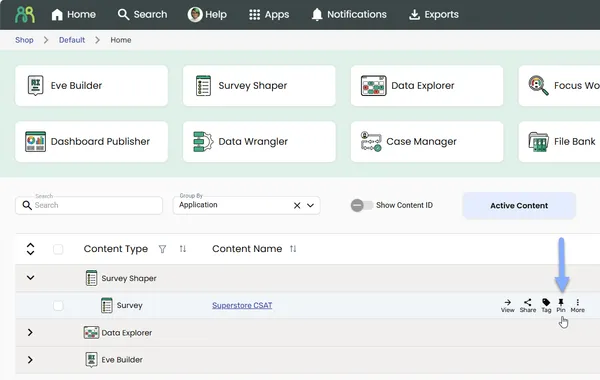
The content immediately appears in the Pinned section at the top of your table while remaining in its relevant application/tag group below.
Unpinning content items
Section titled “Unpinning content items”- Hover over the pinned content row in either the Pinned section or its relevant application/tag group
- Click Unpin in the actions (shows an unpin icon)
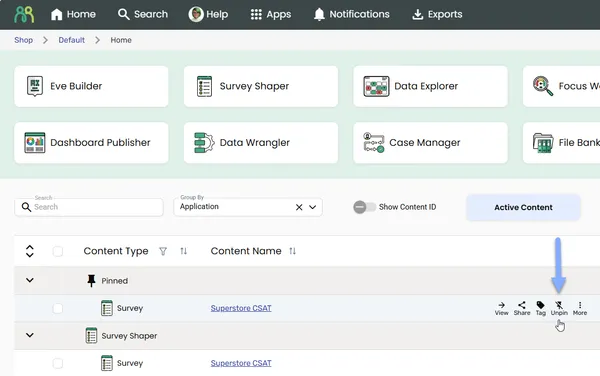
The content immediately disappears from the Pinned section but remains visible in its original application or tag group.
Pinned content with filters and grouping
Section titled “Pinned content with filters and grouping”With filters and status tabs:
- Pinned items that match your current filters stay visible in the Pinned section
- Pinned items that don’t match current filters disappear temporarily (they’re still pinned, just hidden)
- The Pinned section only shows pinned items on the status tab you’re viewing
- Clear filters to see all your pinned content again
With grouping active:
- The Pinned section always appears first, regardless of grouping type
- When grouped by Application: pinned items appear in both the Pinned section AND their original application groups
- When grouped by tags: the Pinned section shows only pinned items that have a tag in that category, and they may appear in multiple tag groups if tagged accordingly
With search active:
- Search works across pinned content just like any other content
- Pinned items matching your search terms remain visible
- Pinned items not matching search terms are temporarily hidden
Frequently asked questions
Section titled “Frequently asked questions”What’s the difference between Hide, Archive, and Delete?
Hide affects only your view. Archive removes content from everyone’s active view but preserves it (you need edit access). Delete moves content to the Recycle Bin and affects all users (only the owner can delete).
How long does content stay in the recycle bin?
Deleted content stays in the Recycle Bin for 30 days before it’s permanently deleted. Anyone with edit access can restore it during this period.
Can I recover permanently deleted content?
No - once content is permanently deleted, either automatically after 30 days or by the owner using Permanently Delete, it cannot be recovered.
My content isn’t appearing in the content table. Why?
Check you’re in the correct account/sub account context and verify the content hasn’t been hidden, archived or deleted. Also check if any filters are active (look for solid filter icons in the column headers) or if you’re grouped by a tag category - content without a tag in that category isn’t shown. Clear any filters, switch Group By back to Application, and click Refresh to reload the latest content.
Why would I need to see Content GUIDs?
Most users won’t need GUIDs for daily work. They’re primarily useful when working with technical support, developers, or when integrating Portal with other systems. They can also be helpful when trying to identify content that have similar names.
Can I search for content using a GUID?
Yes! If you have a GUID, you can search for it in the content table.
Will the Content GUID change if I rename or edit my content?
No, the GUID remains constant throughout the content’s lifetime. You can rename, edit, or move content without affecting its unique identifier.
Can two pieces of content ever have the same GUID?
No - GUIDs are generated so that, in practice, every piece of content has its own unique identifier.
How do I know what tag categories are available?
Open the Apply Content Tags dialog on any content item (via Tag on the row or Tags in bulk actions) to see all available tag categories and their codes. Or check the Group By dropdown - tag categories appear as grouping options there too.
Can I create my own tag categories?
No - only account admins, sub account admins, and sub account owners can create tag categories. This ensures consistent organization across your team. Contact your admin if you need new categories or codes added.
What happens to my content if a tag category gets deleted?
You can no longer group by a deleted tag category, and its tags no longer show in the Portal.
Can I apply multiple tags from the same category?
Yes - content can have multiple tags from any category. A dashboard covering three countries could have Australia, New Zealand, and France tags all applied. When you group by Countries, that dashboard appears in all three sections.
Can other users see what I’ve pinned?
No - your pinned items are personal to you. Other users can pin their own content, but they can’t see what you’ve pinned and you can’t see what they’ve pinned.
What happens to pinned content if I switch sub accounts?
Pins are sub account-specific. When you switch sub accounts, you’ll see different pinned content (or no pinned content if you haven’t pinned anything in that sub account yet). Your pins in the original sub account remain intact.
If I archive or delete pinned content, what happens?
Archived or deleted content no longer appears in the Pinned section on the Active Content tab, because the Pinned section only shows content on the tab you’re viewing.
Can I pin content that someone shared with me?
Yes - you can pin any content you have access to, whether you own it or someone shared it with you. This is useful for pinning team dashboards or shared projects you reference frequently.
Does pinning affect how content appears for other users?
No - pinning is purely a personal organization tool. When you pin content, it only affects your view. The content owner and other users see the content in its normal position in their tables.
Why do I see the same content twice when I pin it?
This is intentional - pinned content appears in both the Pinned section (for quick access) and its original location (for logical organization). This way you can quickly find your active projects at the top while still maintaining the full organizational structure of your content table.
Can I unpin content from either location?
Yes - you can unpin content whether you’re hovering over it in the Pinned section or in its original application/tag group. The Unpin option works the same way from both locations.
Can I pin or unpin multiple items at once?
No - pinning and unpinning works only on individual content items. You’ll need to pin or unpin items one at a time using the actions that appear when you hover over each row. Bulk pinning isn’t available because pins are meant for focused, personal prioritization of a small number of active items rather than mass organization.
How do I know if I have filters active?
Look at the column headers in your content table - if a filter icon appears solid (filled) instead of outlined, that column has an active filter. Click the solid filter icon to see what’s filtered and use the “Clear” button to remove it.
Can I use multiple filters at the same time?
Yes - you can apply both content type filters and time period filters simultaneously. They work together to narrow your results. For example, filter by “Dashboard” content type AND “Last 7 Days” to see only recent dashboards.
Why did all my content disappear after filtering?
Your active filters might be too restrictive, or you might not have any content matching those criteria. Check for solid filter icons in the column headers and clear them one at a time to see which filter is causing the issue. Also verify you’re in the correct account/sub account context.
Do filters work when content is grouped?
Yes - filters and search work across all groups, so each group shows only its matching content.
Can I filter by tags?
Not directly through a filter dropdown, but you can use the search box to filter by tag codes or category names. Type a tag code like “Australia” or “#2463” and the table will show only content with that tag. You can also use the “Group By” dropdown to organize content by tag categories.
What’s the difference between filtering by content type and using the status tabs?
Content type filters let you narrow down by type (Survey, Dashboard, Text Explorer, etc.), while status tabs filter by content lifecycle stage (Active Content, Hidden Content, Archived Content, Recycle Bin). You can use both together - for example, view only archived dashboards by selecting the Archived Content tab and applying a Dashboard filter.