

Creating an Action Connect project
Creating a project connects your feedback data to Action Connect’s AI. A four-step wizard walks you through it:
- Customer Feedback & Ratings - where your feedback (and any ratings) live
- Identifiers - who owns each piece of feedback, and the filters and labels you’ll want later
- Tracking & Date Format - which dates to track and how to group them
- Priority Analysis Filters - optional breakdowns for the Opportunity Score
The way you collect feedback decides how you fill in step 1, so read through the scenarios below before you start.
Understanding your data setup
Section titled “Understanding your data setup”Action Connect handles three data setups:
Scenario 1: Customer feedback only (no response ratings)
You collect customer feedback but don’t track a numeric rating against it. This is the simplest setup, and a great way to get started with categorizing feedback.
Scenario 2: Customer feedback and response ratings in the same data source
Feedback and ratings live in the same survey. For example, a customer gives open-ended feedback and also answers an overall satisfaction question at the same time. Each piece of feedback is then linked to that customer’s score.
Scenario 3: Customer feedback and response ratings in separate data sources
The feedback and ratings come from different times or places, and need to be linked by a shared identifier. This includes:
- Separate surveys or data stores: Feedback from one survey, follow-up ratings from another (for example, a second round of outreach asking how well the original feedback was handled).
- Same data store, different survey waves: A longitudinal program where Wave 1 and Wave 2 are scripted into the same data store, but the rating belongs to the second wave. Treat these as separate sources and use a linking variable to connect the two waves. See Linking across survey waves.
Starting the wizard
Section titled “Starting the wizard”- Open Action Connect - Click the Action Connect card on Portal home.
- Create a project - Click Create Project, type a name in the Name New Action Connect Project dialog, and click NEXT.
- Choose your data scenario - Use the two ratings toggles at the top of step 1 to match your data setup, then follow the steps for your scenario below.
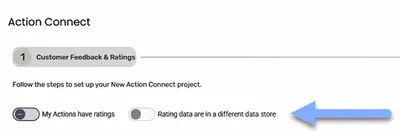
Step 1: Customer Feedback & Ratings
Section titled “Step 1: Customer Feedback & Ratings”Scenario 1: Feedback only
Section titled “Scenario 1: Feedback only”- Leave ratings off - Leave My Actions have ratings turned off.
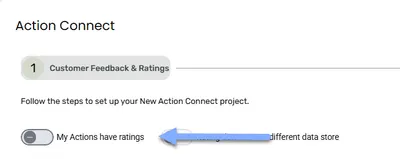
- Choose the data source - Click SELECT DATA SOURCE, choose where your feedback lives, and click OK.
- Choose the feedback variables - Click Add Variable(s) and drag your customer feedback text variable(s) into the selection area.
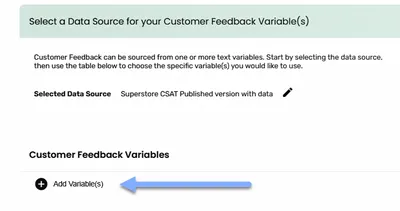
- Check the context - Review the Context for Action Categorisation (see Giving the AI context), then click Save.
- Continue - Click Next.
Scenario 2: Feedback and ratings in the same data source
Section titled “Scenario 2: Feedback and ratings in the same data source”- Turn on ratings - Turn on My Actions have ratings, and leave Rating data are in a different data store off.
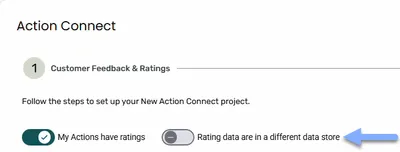
- Choose the data source - Click SELECT DATA SOURCE, choose where your feedback and ratings live, and click OK.
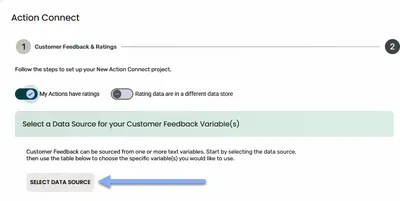
- Choose the feedback variables - Under Customer Feedback Variables, click Add Variable(s) and drag in the text variable(s) containing the feedback.
- Check the context - Review the Context for Action Categorisation (see Giving the AI context), then click Save.
- Choose the rating variables - Each feedback variable now has a matching row under Response Rating Variables. Click Add Variable on each row and choose the rating (for example, an overall satisfaction score) that goes with that feedback.
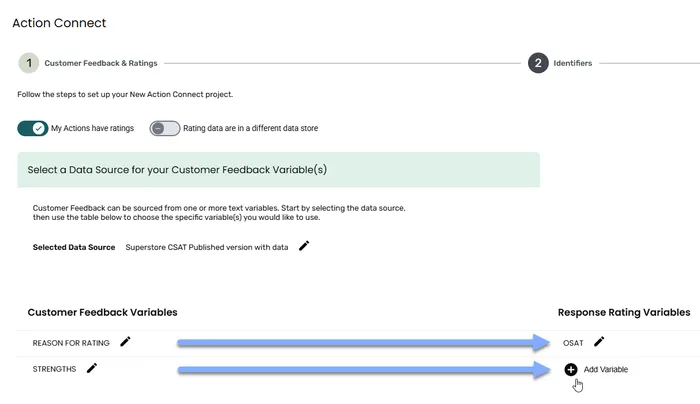
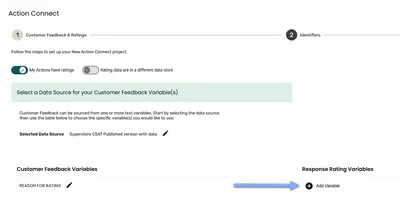
- Continue - Click Next once every feedback variable has a rating.
Scenario 3: Feedback and ratings in separate data sources
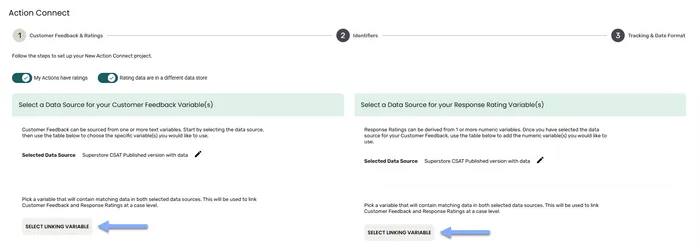
Section titled “Scenario 3: Feedback and ratings in separate data sources”- Turn on both toggles - Turn on My Actions have ratings and Rating data are in a different data store.
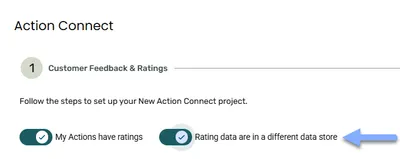
- Choose the feedback data source - On the left, click SELECT DATA SOURCE, choose where your feedback lives, and click OK.
- Choose the ratings data source - On the right, click SELECT DATA SOURCE, choose where your ratings live, and click OK. This can be the same data store if you’re linking across survey waves.
- Choose the linking variables - Once both data sources are chosen, click SELECT LINKING VARIABLE under each one and pick the variable holding the shared identifier.
- Choose the feedback variables - Click Add Variable(s) and drag in the text variable(s) containing the feedback.
- Check the context - Review the Context for Action Categorisation (see Giving the AI context), then click Save.
- Choose the rating variables - For each feedback variable, click Add Variable and choose its rating variable.
- Continue - Click Next once every feedback variable has a rating.
Giving the AI context
Section titled “Giving the AI context”When you choose your feedback variables, the Context for Action Categorisation box suggests a short description of your feedback. The AI uses it to create and assign categories, so it’s worth a quick edit.
Rating tips
Section titled “Rating tips”- One rating can cover all your feedback. If your survey has one overall satisfaction score, use it for every feedback variable. Otherwise, choose one rating per feedback variable.
- Exclude values like “Don’t know”. If a rating variable has a codeframe, click the filter icon on it to open Define Valid Rating Values. Untick the values that shouldn’t count, such as a “Don’t know” code. Unticked values still show against the feedback, but they’re left out of averages and Opportunity Scores.
Step 2: Identifiers
Section titled “Step 2: Identifiers”The instruction at the top reads “Assign an Action Owner ID (email) of the person responsible for that action.” Drag variables from the list into these boxes:
| Box | What it’s for | Limit |
|---|---|---|
| Project Filter Variables | Become the Other filters on every tab, so you can slice the feedback by things like region, product line or account tier. They can also be used in access filters. | No limit |
| Label Variables (Max 10) | Show alongside each piece of feedback in the Action Details dialog, for context. They’re not used for filtering. | 10 |
| Action Owner ID | Identifies the person responsible for each piece of feedback, such as the account owner’s email. It becomes the Owner ID filter, so each owner can quickly find their own to-do list. | Exactly 1. Required. |
Importing only some of the feedback
Section titled “Importing only some of the feedback”Want the project to ignore part of your data, such as one region or a test segment? Use a filter variable to restrict what gets imported.
- Add the variable - Drag it into Project Filter Variables. It needs a codeframe.
- Open its filter - Click the filter icon on the variable. The Filter dialog explains: “Only incoming data matching the checked values will be imported.”
- Choose the values - Tick the values you want to keep and click Save.
This applies to all feedback the project ever imports, not just the data that’s there today. To remove the restriction, open the filter again, untick everything and click Save. The restriction is listed under Incoming Data Filters on the Configuration tab of Project Settings.
Step 3: Tracking & Date Format
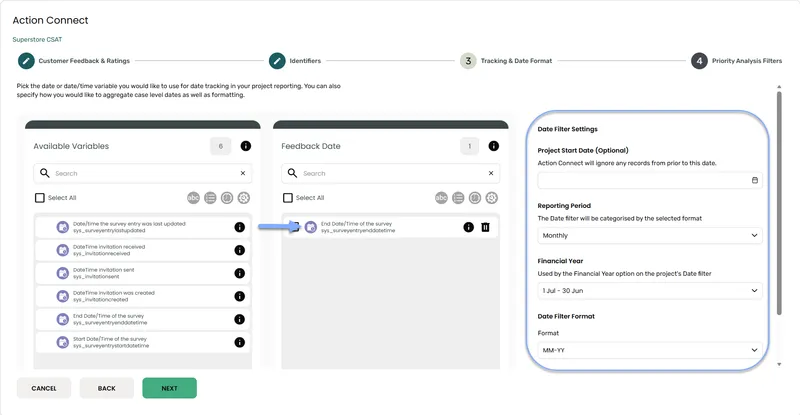
Section titled “Step 3: Tracking & Date Format”- Choose the feedback date - Drag a date or date/time variable into Feedback Date. Only one is allowed, and it’s required.
- Choose the rating date - If your project has ratings, also drag the date the rating was given into Rating Date. In scenario 3, it must come from your ratings data source.
- Set a start date (optional) - Pick a Project Start Date (Optional) if you want Action Connect to ignore older feedback. Anything from before this date is skipped, now and in future imports.
- Choose a reporting period - Monthly (the default), Quarterly or Yearly. This sets how the period filter groups dates.
- Choose your financial year - Under Financial Year, pick when your financial year runs: 1 Jul - 30 Jun (the default), 1 Oct - 30 Sept or 1 Apr - 31 Mar. These are the same choices Text Auto Reports offer. It’s used by the Financial Year option on the period filter.
- Choose a date format - Pick a Date Filter Format, such as MM-YY (the default), MMM-YYYY or DD-MM-YYYY.
- Continue - Click Next.
The financial year can’t be changed once the project is created. It isn’t listed on the Configuration tab, but the Financial Year option on the period filter shows it, for example Financial Year (1 Apr - 31 Mar). Projects created before this setting was added use 1 Jul - 30 Jun.
Step 4: Priority Analysis Filters
Section titled “Step 4: Priority Analysis Filters”This step is optional. It controls the extra breakdowns on the Opportunity Score tab, so it only matters for projects with ratings.
The left box lists the Project Filter Variables you chose in step 2. Drag any you want broken down into Priority Analysis Filters. On the Opportunity Score tab, each sub category then gets a row for every value of that variable. For example, add “Region” to see a score for each region.
Variables you leave out still count toward the overall score. They just don’t get their own rows.
If you didn’t choose any filter variables in step 2, you’ll see a message saying so. You can go back and add some, or carry on without them.
Click Next to create the project.
After you create the project
Section titled “After you create the project”Action Connect creates the project and opens a Hang Tight! page while it gets set up. Behind the scenes, it:
- creates a data store for the project, holding all the feedback along with the categories, responses and initiatives Action Connect adds. You’ll find it in Data Wrangler under Action Connect Data Stores, so the enriched data can also be used in dashboards and elsewhere;
- creates a starting set of feedback categories from your data;
- categorizes your feedback and drafts responses.
You don’t have to wait on the page. The project shows as Initializing on the Action Connect home and switches to Ready when it’s done.
Linking across survey waves
Section titled “Linking across survey waves”If you run a longitudinal program where the original feedback and the follow-up rating are in the same data store but in different survey waves, set it up as scenario 3: turn on Rating data are in a different data store and choose the same data store on both sides.
For this to work, your survey needs a linking variable in the second wave: a variable that stores the unique identifier (GUID) of the matching first-wave response. Then choose that identifier as the linking variable on each side.
Frequently asked questions
Section titled “Frequently asked questions”What types of data can I use with Action Connect?
Any HumanListening data store works: Survey Shaper surveys or files uploaded through Data Wrangler. The key is having text feedback that needs categorizing and a response.
Can I use multiple text fields as feedback sources?
Yes. If your survey has several open-text questions, like “What should we improve?” and “Any other comments?”, you can select them all. If you track ratings, each one needs a rating variable, but they can share the same one.
What makes a good linking variable?
Something unique and consistent across both data sources, such as a customer ID, email address or GUID. Avoid names or dates, which might be formatted differently in each system.
What’s the difference between filter variables and label variables?
Filter variables become filters on every tab, so you can slice all the feedback by that dimension. Label variables show alongside each piece of feedback in the Action Details dialog, for context. A variable can be both.
What does step 4 do if my project has no ratings?
Nothing you’ll see. Priority Analysis Filters only affect the Opportunity Score tab, which needs ratings. You can skip it.
Why does the feedback date matter?
It powers the period filter, so you can focus on recent feedback and track trends over time. It’s required for every project.
What happens when new feedback arrives?
Action Connect checks your data source regularly and categorizes new feedback automatically. Project Last Discovered in the project header shows when it last checked.
How accurate is the AI categorization?
It gets better with a specific context description and with your corrections. Always review the suggestions rather than accepting them blindly. The goal is to speed you up, not replace your judgment.
Common issues and solutions
Section titled “Common issues and solutions””My linking variable isn’t connecting records”
Section titled “”My linking variable isn’t connecting records””Values must match exactly between the two data sources, including capitalization and spacing.
- Compare the formats - Export a sample from each data source and compare the linking variable values.
- Look for common mismatches - Extra spaces, different capitalization, or different number formatting.
- Test with a subset - Create a small test project with just a few records to check the link works.
”The AI’s categories don’t make sense for my industry”
Section titled “”The AI’s categories don’t make sense for my industry””The context description drives the AI’s understanding, so make it more specific to your business and the kind of feedback you collect.
- Improve the context - Include your industry, the type of feedback, and what it’s usually about.
- Shape the categories - In Settings > Feedback Categories, set up categories that fit your business, then Save Categories & Retag. See Feedback Categories tab.
- Review early results - Correcting the first batch of suggestions helps the AI with similar feedback later.
”Error creating project. Please try again.”
Section titled “”Error creating project. Please try again.””Creating the project failed at the last step. The wizard keeps your choices, so you can try again straight away. If it keeps happening, check that your data sources and variables are still available, then contact support.