

Managing accounts and sub accounts
Every HumanListening subscription includes an account and its default sub account. Think of this as your organizational foundation - the account represents your main organization, while sub accounts create secure, separate workspaces for different teams or clients.
Sub accounts are essential when:
- Managing multiple clients (agencies, consultants)
- Separating different business units or departments
- Maintaining strict data privacy between projects
- Complying with data governance requirements
Key security feature: Content created in one sub account can’t be accessed or seen by users from another sub account. This keeps sensitive projects separate.
The account management interface gives you self-service control of your HumanListening subscription. Handle account setup, user management, and security settings so your team can collaborate effectively while keeping data separate and compliant.
Understanding account management structure
Section titled “Understanding account management structure”Account management uses a hierarchical structure that mirrors your organizational needs:
Account level - Your main organizational subscription
- Account ownership and billing management
- Cross-sub account administration
- Global license management and user oversight
Sub account level - Secure, separate workspaces
- Individual team or client management
- Data location compliance controls
- Content and permission management
User hierarchy - Role-based access control
The user hierarchy is based on scope of access rather than exclusive categories. A single person can hold multiple roles at the same time. The names in brackets are the role labels you’ll see in user tables and filters.
Account owner (Is Owner Account, 1 per account)
- Ultimate authority over the entire HumanListening subscription
- Automatically has account admin privileges
- Can access and manage all sub accounts in the account
- Controls account ownership transfer
- May also be designated as sub account owner for specific sub accounts
Account administrator (Can Administer Account, multiple allowed)
- Full access to all sub accounts within the account
- Can manage users, licenses, and account-level settings
- Automatically has admin access to all sub accounts, including new ones
- May also be designated as sub account owner for specific sub accounts
Sub account owner (Is Owner Sub Account, 1 per sub account)
- Owns a specific sub account. Whoever creates a sub account becomes its owner.
- May also be an account owner or admin (giving them broader access)
- Can manage users, content, trusted domains, and activity logs for their sub account
- No access to other sub accounts unless separately granted (or they are an account owner or admin)
- Controls sub account ownership transfer
Sub account administrator (Can Administer Sub Account, multiple per sub account)
- Full access to their specific sub account
- Automatically granted to account owners and admins
- Can manage users, content, trusted domains, and activity logs for their sub account
- No access to other sub accounts unless separately granted (or they are an account owner or admin)
Sub account user (Can Access Sub Account)
- Access to content within their assigned sub account(s)
- Can create content if granted an application license
- Can’t access administrative functions
Accessing account management
Section titled “Accessing account management”Account management opens at the level you’re allowed to manage.
- Click your user avatar at the top-right of any page
- Select “Manage Account” from the menu, or “Manage Sub Account” if you only administer sub accounts
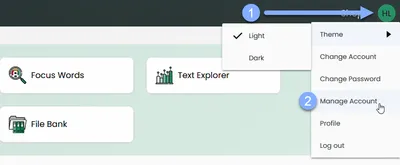
The Account Management page has two tabs at the top:
- Account Level - for account owners and admins. It’s disabled if you only administer sub accounts.
- Sub Account Level - shown if you administer at least one sub account.
Account-level management
Section titled “Account-level management”Account-level management provides oversight across your entire HumanListening subscription, including all sub accounts, users, and organizational settings. Account owners and administrators use this interface to manage the top-level structure and keep control across all business units.
- Click your user avatar at the top-right of any page
- Select “Manage Account” from the menu
- Ensure the “Account Level” tab is selected (not “Sub Account Level”)
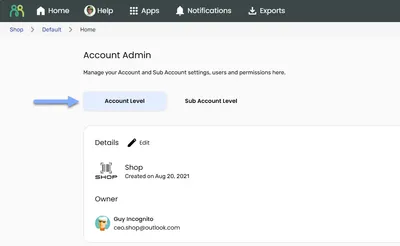
- Use the tabs to access different management functions
- Sub Accounts - Manage your secure spaces and create new ones
- Account Admins - Control who has administrative access across your entire subscription
- Licenses - Grant and revoke application licenses for content creation
- Feature Access - See where Agent and MCP usage is going across your sub accounts
Account information
Section titled “Account information”The Account Details card displays your subscription’s core information:
- Account name - Your organization’s primary identifier in HumanListening
- Account logo - Visual identifier shown throughout the platform
- Created on - When your HumanListening subscription was established
- Account Owner - Current owner’s name and email
Updating account details
Section titled “Updating account details”- Click “Edit” in the Account Details card
- Change the Account Name if needed
- Upload a new logo under Upload Logo - png, jpg or jpeg, up to 2 MB
- Tick “Hide the account name from the card on the account picker screen” if you only want the logo to show
- Click OK to save
Account changes affect all sub accounts and users within your subscription, so coordinate updates with your organization first. Renaming the account also changes its web address, so update any bookmarks afterwards.
Transferring account ownership
Section titled “Transferring account ownership”Only the current account owner sees the Transfer button.
- Click “Transfer” next to Account Owner in the Account Details card
- Choose the New owner from the list of account admins
- Click OK - both the new and previous owner are notified by email
Sub Accounts tab
Section titled “Sub Accounts tab”The Sub Accounts tab lists all sub accounts in your account and lets you create new ones.
Sub account information displayed:
- Sub Account - The sub account’s name and logo
- Owner - Current sub account owner
- Created - When the sub account was created
Use the search box to find a sub account by name. Click any sub account to open it at the sub account level.
Creating new sub accounts
Section titled “Creating new sub accounts”Account owners and administrators can create a new sub account:
- Navigate to the Sub Accounts tab at the account level
- Click “Add Sub Account” - the Create New Sub Account dialog opens
- Enter a Sub Account Name (at least 3 characters)
- Choose a Data Location - the country where all data for this sub account will be stored and processed
- Tick “Hide the sub account name from the sub account card” (optional)
- Upload a logo under Upload Logo (optional) - png, jpg or jpeg, up to 2 MB
- Click OK to create the sub account
You become the owner of any sub account you create. All account owners and admins automatically get admin access to it.
Account Admins tab
Section titled “Account Admins tab”The Account Admins tab manages account administrators - the people who need administrative access across your entire HumanListening subscription.
What this table shows:
- Account administrators only - Users with the Can Administer Account role. The account owner isn’t listed here; they’re shown in the Account Details card.
- Cross-sub account access - These users automatically have admin privileges in every sub account
- License - The type of application license each admin holds
- User details - Click the View (eye) icon to see a user’s role, license type, created date and the sub accounts they belong to
Table features:
- Search - Find administrators by name, email or license
- Row actions - View, plus a More (⋮) menu with Duplicate User, Resend Access Notification, Delete User and Revoke Admin Access
- Bulk actions - Tick two or more users to show an action panel with Delete and Notify
Adding account administrators
Section titled “Adding account administrators”- Navigate to the Account Admins tab at the account level
- Click “Add Account Admin” - the Add Account Admin User dialog opens
- Enter user details - First Name, Last Name and Email Address. You can pick an existing user from the email list or type a new address.
- Grant application license (ticked by default) - gives content creation rights across all sub accounts
- Notify user via email (ticked by default) - sends an invitation email to the new admin
- Click OK - the user becomes an account administrator with admin access to all sub accounts
What happens when you add an account administrator:
- They automatically get admin access to every existing sub account
- They’ll have admin access to any new sub accounts created in the future
- They can manage users, content, and settings across the entire account
Revoking account admin access
Section titled “Revoking account admin access”Sometimes you need to remove someone’s account administrator privileges while keeping them in your account. This is different from deleting a user entirely - you’re changing their role from administrator to regular user.
- Navigate to the Account Admins tab at the account level
- Locate the user in the table
- Click the More menu (⋮) on their row
- Select “Revoke Admin Access”
- Click Confirm in the Revoke Administrator Access dialog - this removes their account administrator role immediately
Important considerations:
Sub account access - Revoking account admin access makes the user a regular user (Can Access Sub Account) in every sub account, including any where they were previously a sub account admin. If they should stay an admin of a particular sub account, add that role again on the sub account’s Users tab.
Content ownership - The user keeps ownership of any content they created.
License retention - Application licenses aren’t automatically revoked when admin access is removed.
Immediate effect - The change happens instantly. The user loses access to account management straight away.
Re-granting access - To restore their admin privileges later, add them again with Add Account Admin.
Removing users from the account
Section titled “Removing users from the account”Deleting a user at the account level removes them from the account and from every sub account.
- Navigate to the Account Admins tab at the account level
- Click the More menu (⋮) on the user’s row and select “Delete User”
- Choose a New owner in the Remove User dialog - all of this user’s content (public and private) is transferred to that person
- Click OK
To remove several users at once, tick their rows, click Delete in the action panel, and choose a New owner in the Remove Selected Users dialog.
Duplicating users and resending notifications
Section titled “Duplicating users and resending notifications”- Duplicate User - In the More menu, choose Duplicate User to copy one person’s access and permissions to another email address. Enter the new person’s name and email, then click OK. This works on the Account Admins tab and the sub account Users tab.
- Resend Access Notification - In the More menu, choose Resend Access Notification, then Confirm, to email the user their access details again. To notify several users at once, tick their rows and click Notify in the action panel.
Licenses tab
Section titled “Licenses tab”The Licenses tab manages application licenses that let users create content across all your sub accounts.
The Manage Application Licenses table lists every licensed user with their License type:
- Account - An account license
- Global - A consulting license. Global licenses can’t be revoked from this tab.
Application licenses can be granted in two ways: during user creation or afterwards for existing users.
Granting licenses to new users
When an account owner or admin adds a user, they can tick Grant application license to give the user immediate content creation access.
Granting licenses to existing users
-
Navigate to Manage Application Licenses
- Click your avatar → Manage Account
- Ensure the Account Level tab is selected
- Select the Licenses tab
-
Click “Grant License”
-
Select one or more users in Select users to grant license
- Only users already in your account who don’t have a license are listed
- If the user isn’t listed, add them to your account first
-
Click OK to assign the licenses
- Each user gains content creation access immediately
- Each user is emailed automatically to let them know
What happens after granting a license:
- The user can create new projects in all applications
- They can build content in any sub account they have access to within the account
- They appear in the Manage Application Licenses table
To resend the license email, click Notify on the user’s row.
Revoking application licenses
Section titled “Revoking application licenses”- Navigate to the Licenses tab at the account level
- Find the user in the table
- Click “Revoke License” on their row
- Click “Yes, Remove” in the Remove License dialog
- This immediately removes their content creation access
Feature Access tab
Section titled “Feature Access tab”The Feature Access tab shows where your Agent and MCP usage is going across sub accounts. Each sub account has its own monthly usage allowance, which you can see on that sub account’s Users tab.
The table shows:
- Sub account - The sub account’s name and how many users have Agent access
- Users with Agent Access - The number of users granted the Agent
- Usage this month - Agent usage (tokens) and MCP usage (credits) against the sub account’s monthly allowance
Use the filter to show All Access, Agent, MCP or Not enabled sub accounts, and the search box to find a sub account by name.
To connect an AI assistant over MCP, see Connecting AI assistants.
Sub account-level management
Section titled “Sub account-level management”Sub account management gives you focused control over individual workspaces within your account. This is where you’ll handle day-to-day user management, content, and security settings for specific teams or clients.
Accessing sub account management
Section titled “Accessing sub account management”- Click your user avatar at the top-right of any page
- Select “Manage Account” (or “Manage Sub Account” if you only administer sub accounts)
- Navigate to your target sub account by either:
- Clicking the sub account in the Sub Accounts tab at the account level, or
- Clicking the Sub Account Level tab and choosing from the Select Sub Account dropdown. Only sub accounts you can administer are listed.
- Use the tabs to access different management functions: Users, Manage Content, User Groups, Trusted Domains, Tag Manager, Activity Log and Ownership History
Sub account details
Section titled “Sub account details”The Sub Account Details card displays core information:
- Sub account name - The sub account’s primary identifier in HumanListening
- Sub account logo - Visual identifier shown throughout the platform
- Created on - When the sub account was created
- Location - The data location chosen when the sub account was created
- Sub Account Owner - Current sub account owner’s name and email
Updating sub account details
Section titled “Updating sub account details”- Navigate to the target sub account using the steps above
- Click “Edit” in the Sub Account Details card
- Update the Sub Account Name, tick or untick Hide the sub account name from the sub account card, and/or upload a new logo under Upload Logo
- Click OK - the page reloads with your changes
Transferring sub account ownership
Section titled “Transferring sub account ownership”Only the current sub account owner sees the Transfer button.
- Click “Transfer” next to Sub Account Owner in the Sub Account Details card
- Choose the New owner from the sub account’s users
- Click OK - both the new and previous owner are notified by email
User management
Section titled “User management”The Users tab lists everyone with access to the sub account, including the sub account owner. The table shows User Information, Role and License. You can search by name, email or license, and filter by role (All Roles, Can Administer Sub Account, Can Access Sub Account) and license (All Users, Consulting License, Account License).
When the Agent or MCP is enabled for the sub account, the table also shows Access and Usage columns. See Agent and MCP.
Adding users to sub accounts
Section titled “Adding users to sub accounts”- Navigate to the target sub account
- Ensure the Users tab is selected
- Click “Add User”
- Enter the user’s First Name, Last Name and Email Address - you can pick an existing user or type a new address
- Select a role - Can Administer Sub Account (sub account admin) or Can Access Sub Account (user)
- Tick “Grant application license” if they need to create content. Only account owners and admins see this option.
- Keep “Notify user via email” ticked to send an invitation
- Click OK to add the user
Removing users from sub accounts
Section titled “Removing users from sub accounts”- Navigate to the target sub account
- Ensure the Users tab is selected
- Click the More menu (⋮) on the user’s row and select “Delete User”
- Choose a New owner - all of this user’s content (public and private) is transferred to that person. You can’t continue until you’ve picked someone.
- Click OK to complete the process
To remove several users at once, tick their rows, click Delete in the action panel, and choose a New owner.
Transferring a user’s content ownership
Section titled “Transferring a user’s content ownership”Use this to hand everything a user owns in the sub account to someone else, without removing their access.
- Navigate to the target sub account and select the Users tab
- Click the More menu (⋮) on the user’s row and select “Transfer Content Ownership”. For several users, tick their rows and click Owner in the action panel.
- Choose the New owner
- Choose what access the previous owner keeps - Edit (default), View or None
- Click OK
You’ll see how many items were transferred. If the selected users don’t own anything in the sub account, you’ll be told there was nothing to transfer. The users’ other access is unaffected. Transfers are listed on the Ownership History tab.
Other user actions
Section titled “Other user actions”The More menu on the Users tab also includes Duplicate User and Resend Access Notification, and the action panel includes Notify. These work the same way as at the account level - see Duplicating users and resending notifications.
Agent and MCP
Section titled “Agent and MCP”The Agent (the in-platform AI assistant) and MCP (connecting your own AI tools) are enabled per sub account by HumanListening. Their usage shows on the sub account’s Users tab.
The Agent uses the AI service for the sub account’s data location. For some data locations, the AI processing can take place outside the data location, while the data stays stored in it. Users see where their data is processed and stored before they start. See Ask EVE: where your data is processed.
If neither is enabled, you’ll see the Unlock Agent & MCP for this sub account banner.
- Click “Request access” on the banner
- Click “SEND REQUEST” - HumanListening will follow up to discuss enabling access
If the Agent or MCP is enabled, you’ll see the Monthly usage allowance card instead. Agent usage (tokens) and MCP usage (credits) are metered separately against the sub account’s monthly allowance.
To ask for a bigger allowance, click Purchase more, then SEND REQUEST. This isn’t an immediate purchase - HumanListening will follow up with an invoice.
Granting or revoking the Agent for a user
When the Agent is enabled, each user needs Agent access before they can use it. The Access column shows an Agent tag for users who have it, and the Usage column shows each user’s share of this month’s usage.
- Click the More menu (⋮) on the user’s row
- Select “Grant Agent Access”, then click GRANT ACCESS
- To take it away, select “Revoke Agent Access”, then click REVOKE ACCESS - any Agent work they have in progress stops and access ends immediately
MCP doesn’t need per-user access. To connect an AI assistant over MCP, see Connecting AI assistants.
Content management
Section titled “Content management”The Manage Content tab gives administrators visibility and control over all content within the sub account. The table shows each item’s Type, Content Name, Content GUID and Owner.
Finding content:
- Use the search bar to search by name, type, GUID or owner email
- Filter by Application, Content Type and Owner
Row actions:
- Delete - Move the item to the Recycle Bin
- Owner - Change who owns the item
- Share - See who has access and share with more people
Sharing content
Section titled “Sharing content”- Navigate to the target sub account
- Select the “Manage Content” tab
- Find the content using search and filters
- Click “Share” on the content row
- Use the share dialog to see current access and add new users as needed
To share several items at once, tick their rows and click Share in the action panel.
Deleting content
Section titled “Deleting content”Administrators can delete any content in the sub account, whoever owns it.
- Find the content on the Manage Content tab
- Click “Delete” on the row, or tick several rows and click Delete in the action panel
- Click “Delete” in the Delete Content dialog - the items move to the Recycle Bin
Changing content ownership
Section titled “Changing content ownership”- Find the content on the Manage Content tab
- Click “Owner” on the row, or tick several rows and click Owner in the action panel
- Choose the New owner in the Change Content Owner dialog. The dialog shows how many items you’ve selected and who owns them now. The new owner must already be a user in this sub account.
- Choose what access the previous owner keeps - Edit (default), View or None
- Click OK
User groups
Section titled “User groups”Create user groups to share content with teams efficiently. Instead of sharing content with individuals every time, groups let you share with entire teams in one click.
User group benefits:
- Available in share dialogs throughout the sub account
- Streamlines recurring team collaborations
- Easy to maintain by adding or removing members as teams change
Creating a user group
Section titled “Creating a user group”- Navigate to the target sub account
- Select the “User Groups” tab
- Click “Add Group” - the Add User Group dialog opens
- Enter a group name - a clear, descriptive name of 3 to 100 characters
- Select at least one user to include in the group
- Click OK to create the group
Managing a user group
Section titled “Managing a user group”- Navigate to the target sub account
- Select the “User Groups” tab
- Click “Manage” on the group row
- Tick or untick users to add or remove them. Use search or Select all visible users to speed things up.
- Click Save to update the group
Deleting a user group
Section titled “Deleting a user group”Click Delete on the group row. The group is deleted immediately, with no confirmation, so double-check before you click.
Trusted domains
Section titled “Trusted domains”Trusted domains control who can receive shared content by restricting sharing to specific email domains. For example, you might limit sharing to yourcompany.com addresses to keep sensitive data within your organization. Once trusted domains are set up, users can only share content with people from those approved domains, plus any trusted users your admins have added.
- Navigate to the target sub account
- Select the “Trusted Domains” tab
- Click “Add Domain” - the Add Trusted Domain dialog opens
- Enter the domain (e.g. ‘yourcompany.com’)
- Click Save to activate the restriction
To change a domain, click Edit on its row. To remove one, click Delete, then Confirm.
How trusted domains work:
- Users can only share content with email addresses from trusted domains, or with trusted users
- To let one outside person in, add them as a user on the Users tab and choose ADD when asked Add Trusted User?
- Without trusted domains, content can be shared with any email address
Tag manager
Section titled “Tag manager”Tags help organize content across all applications in your sub account. While any user can apply tags to content, only administrators can create and manage the tag categories and codes that everyone uses. This centralized approach prevents tag sprawl and keeps a clean, consistent organizational structure.
Why admin-managed tags matter:
- Prevents duplicate or similar tags (avoiding “#Client-ABC”, “#ABC”, “#ClientABC” chaos)
- Creates shared vocabulary across your team
- Maintains clean, searchable content organization
- Ensures tags align with business structure (job numbers, clients, regions, etc.)
Accessing tag manager
Section titled “Accessing tag manager”- Navigate to the target sub account
- Select the “Tag Manager” tab
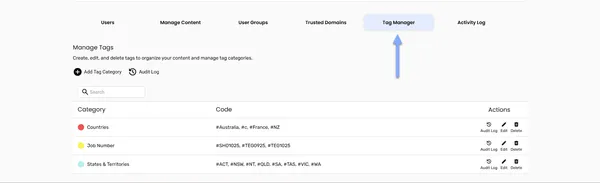
- View existing tag categories in the management table
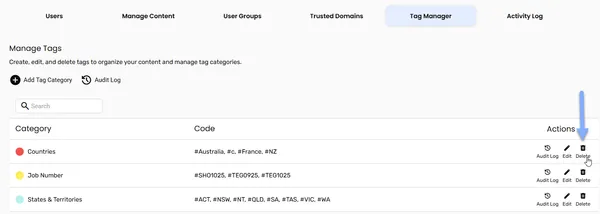
The tag manager table displays:
- Category - The tag category name with its assigned color
- Tag - All tags within that category (shown with # prefix)
- Actions - Audit Log, Edit, and Delete options for each category
Creating tag categories
Section titled “Creating tag categories”Tag categories define the organizational dimensions that matter to your workflow - client names, job numbers, geographic regions, project types, or any other grouping that helps your team find content.
- Navigate to Tag Manager in your target sub account
- Click “Add Tag Category” button
- Enter a Category Name that describes what you’re organizing
- Examples: “Job Number”, “Country”, “Project Type”, “Client”, “Region”
- Use clear, descriptive names everyone will understand
- Select a color from the color picker
- Colors help visually distinguish categories throughout the platform
- Add tags in Add tags to this category
- Press Enter after each code to add it
- Codes automatically get the # prefix
- Add a Description (Optional) explaining what this category is for and when to use it
- Click Save to create the category
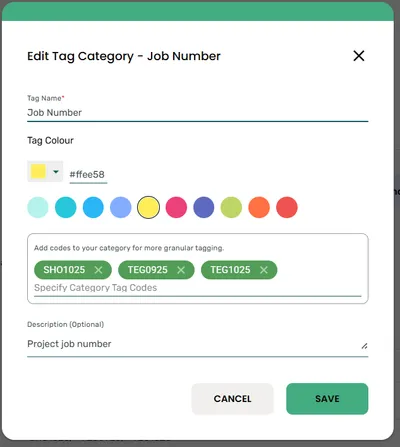
Managing existing tag categories
Section titled “Managing existing tag categories”Editing a category:
- Locate the category in the Tag Manager table
- Click the Edit icon in the Actions column
- Modify the category name, color, or description as needed
- Add new tags by typing in the tags field and pressing Enter
- Remove existing tags by clicking the ‘X’ on any chip
- Click Save to apply changes
Deleting a category:
- Locate the category in the Tag Manager table
- Click the Delete icon in the Actions column
- Click Delete in the Confirm Tag Deletion dialog
Viewing tag audit logs
Section titled “Viewing tag audit logs”Track all changes to tag categories and tags for accountability and compliance. The audit log shows you who made what changes and when, helping you maintain control over your tag structure.
Complete audit log:
- Navigate to Tag Manager in your target sub account
- Click “Audit Log” button above the category table
- Review the audit log table showing:
- Category - Which tag category was modified
- Code - Specific tag that was changed (if applicable)
- Operation - What action was taken (Update Tag Category, Insert Tag Code, etc.)
- User - Who made the change
- Date - When the change occurred
- Use search to find specific categories, users, or operations
- Click “Close” when finished reviewing
Category-specific audit log:
- Navigate to Tag Manager in your target sub account
- Locate the category you want to review in the table
- Click the “Audit Log” icon in the Actions column for that category
- Review changes specific to that category and its tags
- Click “Close” when finished
The audit log helps you:
- Track who’s making changes to your tag structure
- Understand when tags were added or removed
- Maintain compliance with change management requirements
- Troubleshoot tag-related issues by reviewing recent modifications
Activity logs
Section titled “Activity logs”Track user login activity for security and compliance. The activity log shows who’s been using your sub account and when, helping you monitor usage patterns and maintain security.
- Navigate to the target sub account
- Select the “Activity Log” tab
- Review login history for all sub account users
- Search by user email to find specific activity
- Click Export to download the log for record-keeping
Activity log features:
- Shows login counts each month for each user, plus a Total
- Searchable by user email
- Exportable for compliance reporting
- Historical data for trend analysis
Ownership history
Section titled “Ownership history”The Ownership History tab lists content ownership changes made in the sub account, such as those made with Owner on the Manage Content tab or Transfer Content Ownership on the Users tab.
The table shows:
- Date - When the change was made
- Content Item - The item that changed owner
- Previous Owner and New Owner
- Previous Owner Kept - The access the previous owner kept (Edit, View or None)
- Changed By - Who made the change
Use the search box to find changes by content item or user.
Frequently asked questions
Section titled “Frequently asked questions”When should I create a new sub account versus adding users to an existing one?
Create new sub accounts only when you need complete data separation (different clients, different data location requirements, etc). Otherwise, use the same sub account and manage access through permissions and user groups.
Can account admins access all sub accounts automatically?
Yes, account admins automatically have admin access to all sub accounts within the account, including sub accounts created later.
What happens if I revoke someone’s account admin access?
They become a regular user (Can Access Sub Account) in every sub account, including any where they were a sub account admin. Add them back as a sub account admin wherever they still need that role.
What happens to content when I remove a user?
All content stays in place, but you must choose a new owner for any content the user owns before they can be removed. The content remains accessible under the new ownership.
What happens when I delete a user from my account or sub account?
The user can still log into HumanListening, but they can no longer access the sub account they’ve been removed from. Deleting a user at the account level removes them from every sub account in the account.
Can I move content to a new owner without removing anyone?
Yes. Use Owner on the Manage Content tab for specific items, or Transfer Content Ownership on the Users tab to move everything a user owns. Changes are listed on the Ownership History tab.
Can I change the data location after creating a sub account?
No, the data location can’t be changed after sub account creation. This is a permanent setting for data governance compliance.
What’s the difference between having a license and just being a user?
Licensed users can create new projects, surveys, and dashboards. Users without licenses can’t create anything new. Think of it as the difference between being an author and a reader.
How do we get the Agent or MCP for a sub account?
Open the sub account’s Users tab and click Request access on the Unlock Agent & MCP for this sub account banner. Once the Agent is enabled, grant it to each user who needs it with Grant Agent Access. To connect an AI assistant over MCP, see Connecting AI assistants.
Can regular users create their own tag categories?
No - only sub account administrators, sub account owners, account administrators, and account owners can create and manage tag categories. This keeps your tag structure organized and prevents everyone from creating slightly different versions of the same tags. Regular users can apply existing tags to content but can’t modify the tag structure.
Common issues & solutions
Section titled “Common issues & solutions”“User can’t access shared content”
- Verify the user is in the correct sub account - content can’t be shared across sub account boundaries
- Check application licensing - users need a license to create content
- Confirm email address accuracy - small typos prevent access
- Review trusted domain settings - make sure the user’s domain is allowed, or add them as a trusted user
“Can’t see Manage Account or Manage Sub Account”
- Confirm admin permissions - only owners and admins can access account management
- Check with your account owner - request appropriate permissions if needed
- Verify sub account access - make sure you have admin rights to the specific sub account
- Check the redesign setting - with the Portal redesign switched off, account admins see Account Settings instead
“Can’t remove a user”
- Check whether they’re an owner - the account owner and sub account owners can’t be deleted until ownership is transferred
- Pick a New owner - you can’t continue until you’ve chosen who takes over their content