

Dashboard pages
Pages are what you place your dashboard components onto.
New dashboards contain one page by default, but you can add more. Each page will appear as a tab at the top of the published dashboard.

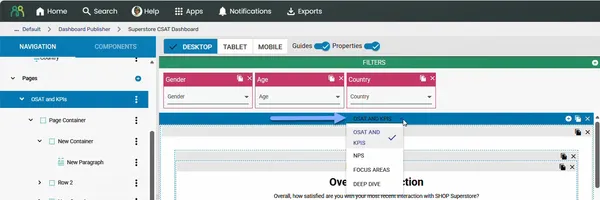
Navigate between pages in Dashboard Publisher via the Navigation Menu in the left panel, or by using the page dropdown in the top center of the middle panel. The page dropdown is only shown when Guides is turned off.
Adding a new dashboard page
Section titled “Adding a new dashboard page”There are two ways to add a new page:
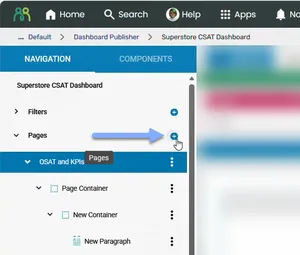
- In the Navigation Menu, click the Add icon in the Pages section.
- In the middle panel page header bar, click the Add Page icon.

Copying an existing dashboard page
Section titled “Copying an existing dashboard page”There are two ways to copy a page:
- Click the more icon (⋮) next to the page you want to copy, then select Duplicate from the menu.
- Click the Copy Me icon in the middle panel.
Hiding a dashboard page
Section titled “Hiding a dashboard page”To hide a dashboard page:
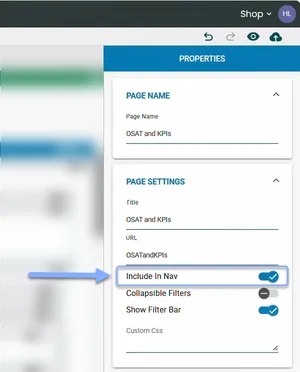
- Select the page in the Navigation Menu.
- In the right panel Properties Menu, click Page Settings.
- Set the Include In Nav toggle to the off position.
Deleting a dashboard page
Section titled “Deleting a dashboard page”There are two ways to delete a page:
- Click the more icon (⋮) next to the page you want to delete, then select Remove from the menu.
- Click the Remove Me icon in the middle panel.
If you delete a page by mistake, click the Undo button to immediately undo the deletion.
Reordering pages
Section titled “Reordering pages”At present it is not possible to reorder the presentation of pages in Dashboard Publisher.
Page properties
Section titled “Page properties”To edit page properties, select a page in the Navigation Menu, then use the Properties Menu in the right panel.
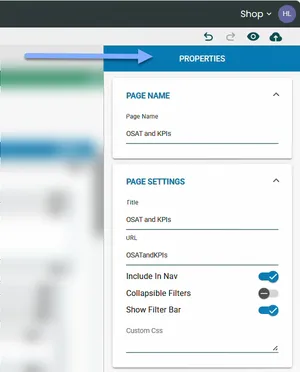
Page properties are organized into three sections:
-
Page Name
- Page Name — the name displayed in the Navigation Menu in the editor. When you change the Page Name, the Title and URL will automatically update to match.
-
Page Settings
- Title — the label displayed on the page tab in the published dashboard. You can customize this separately from the Page Name.
- URL — the unique URL slug for the page. Must not contain spaces or special characters. Each page in the dashboard must have a unique URL.
- Include In Nav — toggle to control whether the page tab is visible in the published dashboard. Turn this off to hide a page from viewers while keeping it in the editor.
- Collapsible Filters — toggle to allow viewers to collapse the filter bar on this page, freeing up screen space for dashboard content. This applies on desktop screens only.
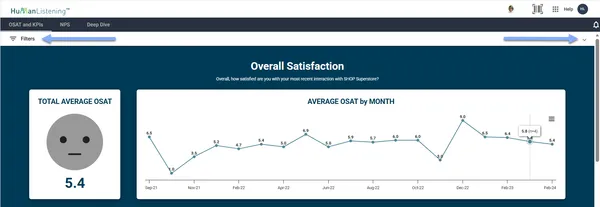
- Show Filter Bar — toggle to control whether the filter bar is displayed on this page. Turn this off to hide all filters on the page. The filter bar is also hidden automatically on any page that has no visible filters.
- Custom Css — enter custom CSS rules that apply only to this page. Page-level styles override any dashboard-level styles set in Dashboard Settings.
-
Data Settings
- Enable Low Base Blocking — toggle to hide the page’s content when its base size is below a minimum. See Low base blocking.
- Minimum Base Size — the smallest base size at which the page is shown.
- Suppression Message — the message viewers see instead of the page content when the page is suppressed.
Low base blocking
Section titled “Low base blocking”Low base blocking hides a page’s content when too few responses sit behind it, for example when a viewer filters down to a very small group. This helps protect respondents’ confidentiality and stops viewers drawing conclusions from unreliable results. Instead of the page content, viewers see your suppression message.
The base size comes from a data exploration you connect to the page. Each time a viewer opens the page or applies filters, the value in your chosen cell is checked against the Minimum Base Size. If the value is below the minimum, the page is suppressed.
To set up low base blocking:
- Select the page in the Navigation Menu.
- In the right panel Properties Menu, click Data Settings and turn on Enable Low Base Blocking. The Configure Base Size Data Source dialog opens.
- Click the Data Exploration tile, then navigate to and click the exploration that contains your base size.
- Click the one cell that holds the base size you want to check (for example, the total count), then click Save.
- Back in Data Settings, enter the Minimum Base Size. This must be a positive number.
- If needed, edit the Suppression Message.
- On the DATA SOURCE tab, under Available Bindings in the Low Base Check: Data Source panel, click each filter that should apply to the base check. A bound filter is shown in blue. Bind the same filters as the components on the page, so the base size matches what viewers are looking at.
- Preview the dashboard to check the page appears and is suppressed as expected.
If you close the dialog without saving, click Add Data Source on the DATA SOURCE tab to configure the base size data source. To change it, click Remove in the Low Base Check: Data Source panel and add it again. Turning off Enable Low Base Blocking removes the base size data source.
Suppression message
Section titled “Suppression message”The default message is:
“This page has been suppressed - responses less than {minimumBaseSize}”
{minimumBaseSize} is replaced with your Minimum Base Size when the message is shown. You can use it in your own message too, and you can format the message with HTML.
Frequently asked questions
Section titled “Frequently asked questions”Can I delete the last page in my dashboard?
No — every dashboard must have at least one page. If you try to delete the only remaining page, you’ll see the message: “Please add another page before deleting this one!” Add a new page first, then delete the one you no longer need.
What happens when I duplicate a page?
Duplicating a page creates a deep copy of the entire page, including all containers, components, and their configurations. Each element in the duplicated page receives a new unique ID. The duplicate is inserted immediately after the original page.
After duplicating, make sure you update the Page Name and URL — duplicate page URLs will trigger a warning when you publish.
How do the Page Name, Title, and URL relate to each other?
When you change the Page Name, the Title and URL are automatically updated to match:
- Title is set to the same value as the Page Name.
- URL is generated by removing all spaces from the Page Name. For example, a Page Name of “OSAT and KPIs” produces a URL of “OSATandKPIs”.
You can then customize the Title and URL independently without affecting the Page Name. However, the next time you change the Page Name, the Title and URL will be overwritten again.
Why do I see page errors when I publish?
When you publish, Dashboard Publisher checks your dashboard and lists any problems in a Dashboard Errors Found! dialog. These are warnings, not blockers: you can click YES to publish anyway, or NO to go back and fix them. We recommend fixing them first, as they may produce unexpected results.
Page-related warnings (where Name, Title and URL are your page’s values):
- Page: “Name” is missing Label Text — the page URL field is empty. Open the page properties and give the URL field a value.
- Page: URL must be unique: “URL” — two or more pages share the same URL. Edit the URL property on the duplicate pages to make each one unique. This commonly happens after duplicating a page.
- Page: “Name” has an invalid Title: “Title” — the page Title must contain at least one letter (A–Z). Titles that contain only numbers or special characters trigger this warning.
Low base blocking warnings (see Low base blocking):
- Low Base Blocking check is enabled but Minimum Base Size is not set to a valid positive number — enter a positive number in Minimum Base Size.
- Low Base Blocking check is enabled but no data source has been configured — click Add Data Source on the page’s DATA SOURCE tab and connect an exploration.
- Low Base Blocking data source is missing a Data Exploration — remove the base size data source and add it again.
- Low Base Blocking data source has no cell selected — open the data source and select a cell — remove the base size data source and add it again, selecting the cell that holds the base size.
Each low base warning starts with the page’s title, so you can tell which page it applies to.
What does “Include In Nav” do?
When Include In Nav is toggled off, the page tab is hidden from the published dashboard navigation. The page still exists and can still be accessed via a direct URL, but viewers won’t see it in the tab bar. This is useful for pages that are only reached via links within other page components.
What does “Collapsible Filters” do?
When Collapsible Filters is enabled, the filter bar on the published dashboard page can be collapsed by the viewer. Instead of the full filter dropdowns, viewers see a compact Filters label with an expand/collapse arrow. Clicking it reveals the full filter bar. This gives viewers more screen space for dashboard content when they don’t need to actively filter.
Collapsible Filters only applies on desktop screens. On tablet and mobile, the filter bar is shown as usual.
What does “Show Filter Bar” do?
When Show Filter Bar is toggled off, the filter bar is completely hidden on that page in the published dashboard. Any filters bound to components on the page will still apply their default values, but viewers won’t be able to interact with them. This is useful for pages where you want a fixed data view without giving viewers the option to change filters.