

Connecting AI assistants with MCP
Connect an AI assistant to HumanListening and you can ask questions of your data right where you’re already working. No exports, and no waiting for someone else to run a crosstab. Ask “How did CSAT move last quarter for the Superstore program?” and your assistant goes and finds out.
The connection runs on MCP (Model Context Protocol), an open standard that lets AI assistants talk to other systems. Because it’s a standard, the HumanListening side is identical whichever assistant you use: same address, same sign-in. What changes is where each assistant keeps its option for adding a connection, and how many of the details you have to type in yourself.
Understanding MCP connections
Section titled “Understanding MCP connections”A few terms come up in every assistant’s setup screens. Here’s what they mean.
Data store: A published dataset, such as survey responses or wrangled data, organized into variables and records. It’s what your assistant reads when you ask it something — the same data store you’d open in Data Wrangler.
Sub account: The container your data stores sit in, and the level MCP is enabled at. You might have access to lots of sub accounts but MCP on only a few, so it’s worth knowing which one you’re working in. See Getting started for how accounts and sub accounts fit together.
MCP server: The HumanListening address your assistant connects to. Everyone uses the same one: https://mcp.humanlistening.com/mcp. You’ll only see your own data, because you sign in with your HumanListening login when you connect.
Client ID: A name that tells HumanListening which application is asking to connect. For this connection it’s HumanListeningMCP, and there’s no client secret. Claude asks you to enter it. ChatGPT, Copilot and Gemini pick it up for you.
Connector: What most assistants call a saved connection to another system. You add the HumanListening connector once, and it stays connected.
Before you start
Section titled “Before you start”Two things need to be in place before your assistant can reach your data.
MCP is enabled on your sub account. HumanListening switches MCP on per sub account, so it isn’t something you can turn on yourself. Account Admins and Sub Account Admins can request it from the Portal, as below. If that isn’t you, ask one of them or your Customer Success Manager.
Your assistant supports custom connectors. Most do, but some plans and organizations turn the setting off. If you can’t find a connectors option in your assistant’s settings, that’s usually why.
Requesting MCP access
Section titled “Requesting MCP access”-
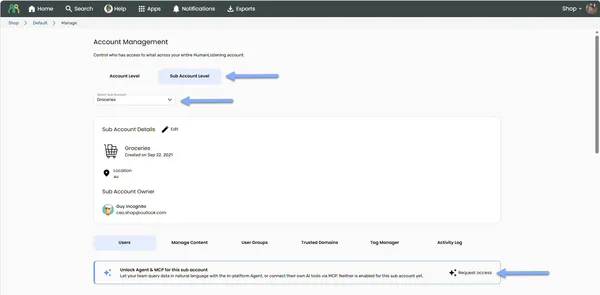
Open the sub account - From your avatar menu, choose Manage Account (or Manage Sub Account if you’re a Sub Account Admin). Open the Sub Account Level tab, then pick the sub account you want MCP on from Select Sub Account.
-
In the Users tab, if neither the Agent nor MCP is enabled yet, you’ll see the Unlock Agent & MCP for this sub account banner. Click Request access.
-
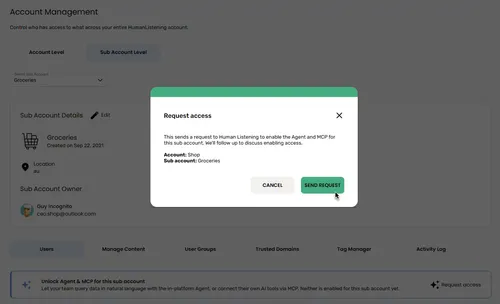
Send the request - Check the account and sub account named in the dialog, then choose SEND REQUEST. The request covers both the Agent and MCP.
-
Wait to hear back - You’ll see a confirmation that your request has been sent, and HumanListening will follow up to discuss enabling access. Once MCP is switched on, it can take up to 15 minutes to start working.
Connecting your assistant
Section titled “Connecting your assistant”One connection covers every MCP-enabled sub account you have access to, so you only set this up once per assistant. Pick yours to jump to its setup steps.
Using a different assistant? Any assistant that supports remote MCP servers can connect with the same details.
Connection details
Section titled “Connection details”These are the full details of the HumanListening connection. Claude, and any other assistant that asks for a client ID, needs all of them. ChatGPT only needs the name and server URL, Gemini only needs the server URL, and the Copilot plugin already has everything built in.
| Field | Value |
|---|---|
| Name | Your choice — we suggest HumanListeningMCP |
| MCP server URL | https://mcp.humanlistening.com/mcp |
| Transport | Streamable HTTP |
| OAuth Client ID | HumanListeningMCP |
| OAuth Client Secret | None — leave it empty |
Claude
Section titled “Claude”Claude works the same in the desktop app and in your browser.
Where the custom connector dialog lives depends on your Claude plan, so we point you to Anthropic’s own instructions for that part. That way you’re always following their current menus.
-
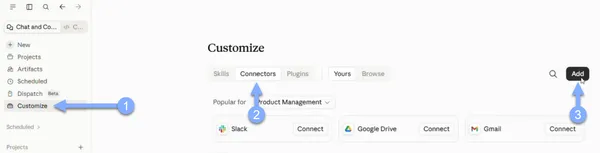
Open the custom connector dialog - Follow Anthropic’s guide to custom connectors to find Add custom connector for your plan.
-
Enter the name and server URL - Use the Name and MCP server URL from Connection details. Claude labels the URL field Remote MCP server URL.
-
Add the client ID under Advanced settings - Expand Advanced settings, enter
HumanListeningMCPas the OAuth Client ID and leave OAuth Client Secret empty. Anthropic’s guide calls this field optional, but HumanListening needs it.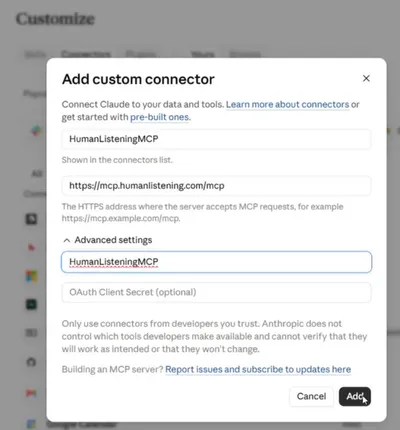
-
Click Add, then Connect - Sign in with your HumanListening login, the way you normally would.
-
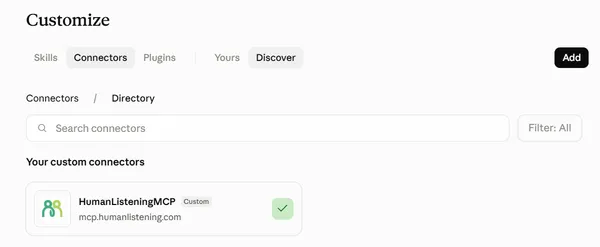
Choose Yes, allow - On the HumanListening permission screen, choose YES, ALLOW. Back in Claude, HumanListeningMCP now appears under Your custom connectors with a green tick.
ChatGPT
Section titled “ChatGPT”Set up the connection in ChatGPT in your browser. You only need the name and server URL. ChatGPT finds the rest of the details itself.
-
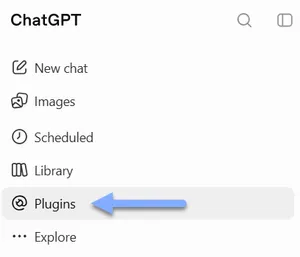
Open Plugins - In ChatGPT, choose Plugins from the left-hand menu.
-
Add a custom MCP server - Open the Add menu at the top right of the Plugins page and choose Add custom MCP server.

-
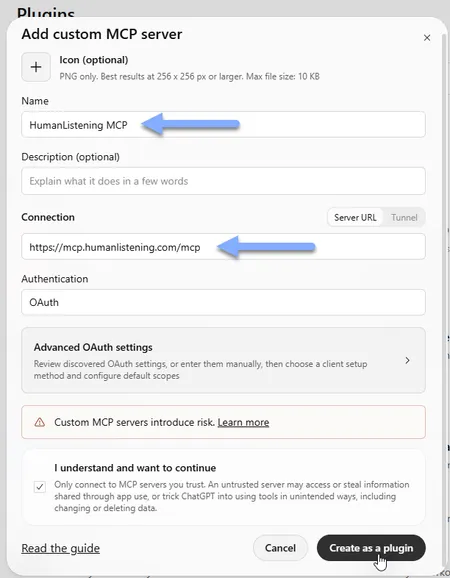
Enter the name and server URL - Give the connection a Name, such as
HumanListening MCP. Under Connection, keep Server URL selected and enterhttps://mcp.humanlistening.com/mcp. Leave Authentication set to OAuth. -
Confirm and create - Tick I understand and want to continue, then choose Create as a plugin.
-
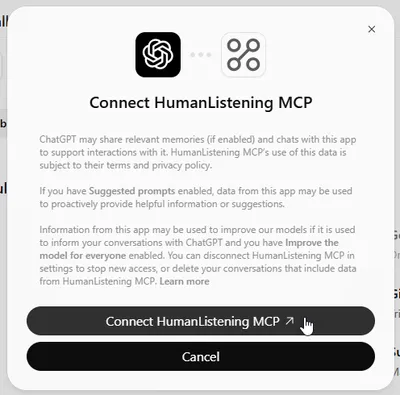
Connect - After a few moments, ChatGPT asks you to connect to the server you just named. Choose Connect.
-
Sign in to HumanListening - A HumanListening sign-in page opens. Sign in with your usual HumanListening login.
-
Choose Yes, allow - On the permission screen, choose YES, ALLOW to let ChatGPT use your HumanListening data. Leave Stay signed in ticked so you won’t be asked to sign in again each time.
That’s it. Start a new chat and check the connection works.
Microsoft Copilot
Section titled “Microsoft Copilot”Copilot connects through Copilot Cowork using a small HumanListening plugin file. The plugin already contains the server details, so there’s nothing to type in.
-
Download the plugin - Download HumanListeningMCP.zip and save it somewhere you can find it. Don’t unzip it.
-
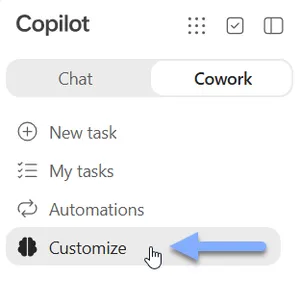
Open Customize/Plugins - Open Copilot in your browser. If there’s a Chat/Cowork switch at the top of the left-hand menu, choose Cowork. Then choose Customize/Plugins from the left-hand menu.
-
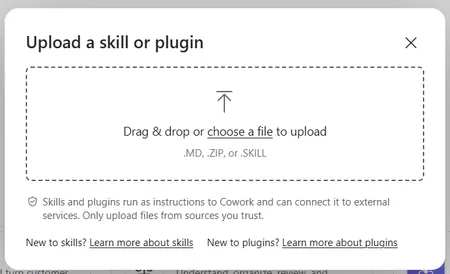
Upload the plugin - On the Customize/Plugins page, open the Cowork tab if there is one. Choose Add on the right, then Upload.

-
Choose the plugin file - In the Upload a skill or plugin box, drag in HumanListeningMCP.zip or choose choose a file to find it.
-
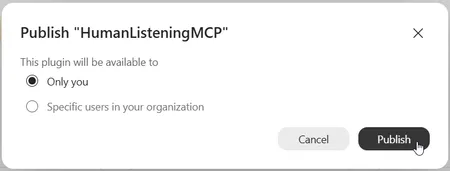
Publish it - Choose who the plugin is available to, then choose Publish. Only you is fine if you’re setting it up for yourself.
-
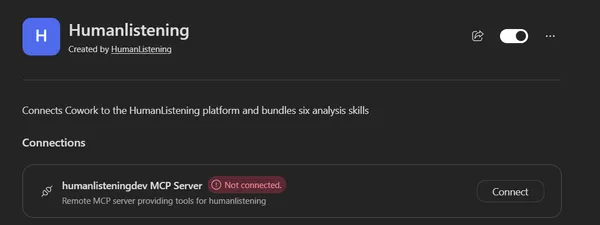
Connect to the server - Open the new plugin from the list on the Customize/Plugins page. Under Connections, choose Connect next to the HumanListening MCP server.
-
Sign in to HumanListening - A HumanListening sign-in page opens. Sign in with your usual HumanListening login.
-
Choose Yes, allow - On the permission screen, choose YES, ALLOW to let Copilot Cowork use your HumanListening data.
Copilot Cowork can now reach your HumanListening data. Start a new conversation and check the connection works.
Google Gemini
Section titled “Google Gemini”Set up the connection in Gemini in your browser. You only need the server URL. Gemini finds the rest of the details itself.
-
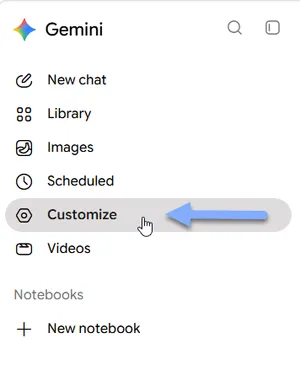
Open Customize - In Gemini, choose Customize from the left-hand menu.
-
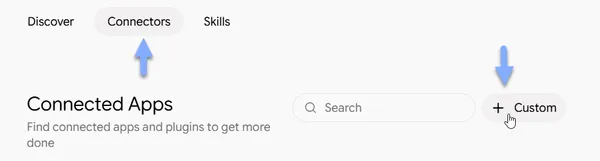
Add a custom connector - Open the Connectors tab, then choose + Custom.
-
Enter the server URL - In MCP Server URL, enter
https://mcp.humanlistening.com/mcp, then choose Next. You don’t need to change anything under Additional settings.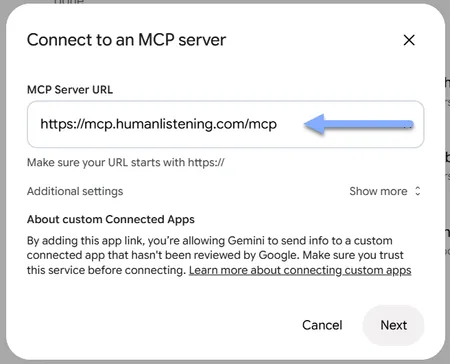
-
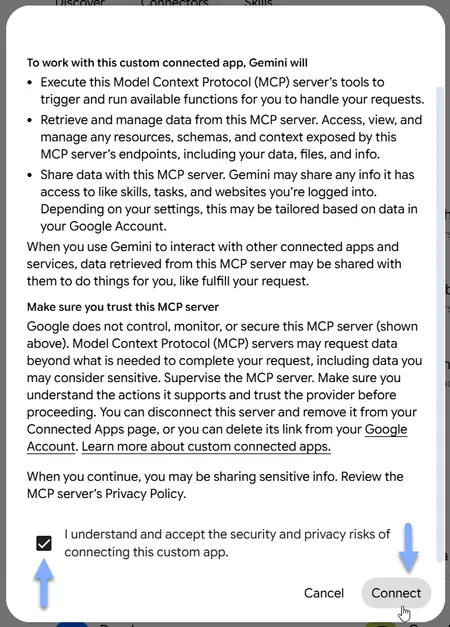
Accept and connect - Read Google’s notice about custom connected apps. Tick I understand and accept the security and privacy risks of connecting this custom app, then choose Connect.
-
Sign in to HumanListening - A HumanListening sign-in page opens. Sign in with your usual HumanListening login.
-
Choose Yes, allow - On the permission screen, choose YES, ALLOW to let Gemini use your HumanListening data.
Gemini can now reach your HumanListening data. Start a new chat and check the connection works.
Checking the connection works
Section titled “Checking the connection works”Don’t take your assistant’s word for it. Ask it something.
-
Start a new chat - Tools attach to a conversation when it starts, so a chat you already had open won’t see the new connector.
-
Ask what it can see - Try “What sub accounts do I have access to in HumanListening?” A list back means your assistant has signed in, reached HumanListening and read your data. Give the first answer a few seconds while it authenticates.
What you can ask
Section titled “What you can ask”There’s no set menu of prompts. Ask the way you’d ask a colleague who has your data stores open in front of them, then follow up when the answer sparks your next question.
That back-and-forth is where the value is. You don’t need one perfect query — start broad, see what’s there, then narrow down.
Not sure where to begin? Try one of these:
- “What sub accounts do I have access to in HumanListening?”
- “What data stores are in the XY sub account?”
- “What variables are in the XY data store?”
- “How did NPS move between May and September?”
- “Show me open-ended responses mentioning delivery.”
- “Show me the questionnaire for the XY survey.”
- “Export the XY data store as an Excel file.”
Your assistant only sees published data stores that have been shared with you. For survey data stores, it can also read the questionnaire: question wording, answer options and routing.
When you ask for an export, you get a CSV (the default), Excel (XLSX) or Parquet file through a download link. Each link works once and expires after 5 minutes, so download it straight away. If it has expired, ask for the export again.
Multi-response questions. When a question lets people choose more than one answer, your assistant reads each option as its own answer column (for example Q1_1 and Q1_3), where 1 means selected, 0 means not selected and blank means no answer recorded. Counts are of cases (responses). The assistant only gives percentages for the question when it can see every option. If some options aren’t available to you, it gives counts for the ones you can see and explains that percentages aren’t possible. Options whose setup can’t be checked aren’t read or exported.
You’ll find your own questions soon enough. The one real boundary: the connection is read-only. Your assistant can find, read, summarize and export your data, but it can’t change any of it.
Usage limits
Section titled “Usage limits”MCP use is metered in credits, separately from the Agent. Each sub account has a daily and a monthly credit limit, and everyone using MCP in that sub account shares them.
Different requests use different amounts:
- Checking which sub accounts you can access is free.
- Listing data stores and variables uses very little.
- Big queries and exports use the most. An export costs about three times as much as the same query.
To make your allowance go further, ask for the variables you need instead of everything, filter down to the records you care about, and ask for a summary rather than raw rows when that’s enough.
When a sub account reaches its limit, your assistant tells you it has run out. The daily limit resets at midnight UTC and the monthly limit at the start of each month. Account Admins and Sub Account Admins can ask for more with Purchase more on the Monthly usage allowance card on the sub account’s Users tab. It isn’t an instant purchase: HumanListening follows up with an invoice.
Admins can see how much MCP each person has used this month in the Usage column on the sub account’s Users tab.
Frequently Asked Questions
Section titled “Frequently Asked Questions”How do I get MCP enabled for my sub account?
HumanListening switches MCP on per sub account, so nobody can enable it from the Portal directly. Account Admins and Sub Account Admins can request it, though: Manage Account (or Manage Sub Account) → Sub Account Level → your sub account → Users, then Request access on the Agent & MCP banner. See Requesting MCP access for the full steps. If you’re not an admin, ask one of them or your Customer Success Manager. Before you do, take a moment to think about who else uses that sub account. Once MCP is on, anyone connecting can read, query and export the data stores they have access to, without dashboard role restrictions.
Which AI assistants can I connect?
Any assistant that supports remote MCP servers. We cover Claude, ChatGPT, Copilot and Gemini because they’re what most people use, but the connection is a standard one. If your assistant lets you add a custom MCP connector, it can connect with the same URL and client ID. See Connecting your assistant for step-by-step setup in Claude, ChatGPT, Microsoft Copilot and Google Gemini.
Do I need a paid plan?
For your assistant, you need a plan that includes custom connectors. If you can’t find a connectors setting, your plan or your organization’s configuration probably doesn’t allow them, so check with whoever manages the assistant for your team.
On the HumanListening side, connecting is free, but MCP use counts against your sub account’s credit allowance, which everyone in the sub account shares. Admins can request more with Purchase more. See Usage limits.
Can I connect more than one assistant at the same time?
Yes. Each connection is independent, so you can have Claude and ChatGPT connected to the same HumanListening account if that suits how you work. Adding a second assistant won’t disturb the first.
Can I connect to more than one sub account at once?
Yes. One connector covers every MCP-enabled sub account your login can reach, so there’s no need to add a separate connector for each one. If more than one has MCP on, your assistant will ask which one to work in, or you can name it in your question.
Can my assistant change my data or edit my surveys?
No. The connection is read-only. Your assistant can list, read, query, summarize and export your data, but it can’t write anything back, delete anything, or change your surveys, data stores or dashboards.
What’s the difference between MCP and the Agent inside HumanListening?
The Agent works inside the platform, and admins switch it on per user from the sub account Users tab. MCP connects an outside assistant and is enabled for a whole sub account. It can’t be limited per user, so everyone with access to the sub account’s data stores can use it, without dashboard role restrictions. They’re metered separately (the Agent in tokens, MCP in credits), so using one doesn’t eat into the other.
Why didn’t my assistant give percentages for a multi-response question?
To work out percentages, your assistant needs every option of the question. If some options are excluded from AI access, or aren’t available to you, it can’t work out the full base. It gives counts for the options it can see instead. See What you can ask.
Why does my assistant say I have hundreds of sub accounts?
Because you probably do. Your assistant lists every sub account your login can reach, then tells you which ones have MCP enabled. Only those can be queried — the rest are listed for completeness.
Is there a client secret?
No. Enter HumanListeningMCP as the OAuth Client ID and leave the client secret empty. If a setup screen insists on a secret, you’re probably in a gateway or enterprise configuration rather than the standard connector setup. See Your assistant asks for a client secret or other extra fields.
Do I need to reconnect every time, and what happens if I remove the connector?
Once it’s authorized, the connection stays put, so you won’t sign in every session. You’ll only need to reconnect if you sign out of your assistant entirely, remove the connector, or your HumanListening credentials are revoked. Remove the connector and your assistant loses access straight away. Your HumanListening data isn’t affected, and you can add the connector again any time with the same details.
Common Issues and Solutions
Section titled “Common Issues and Solutions”Your assistant asks for a client ID after you click Connect
Section titled “Your assistant asks for a client ID after you click Connect”Frustrating, but fixable. This happens when the connector was added without the OAuth Client ID. The connection gets as far as sign-in, then stalls because HumanListening doesn’t know which application is asking.
- Remove the connector - Use the remove or delete option on the connector itself. Editing it in place doesn’t reliably pick up the change, so a clean start saves you a second attempt.
- Add it again with the client ID - Recreate the connector, expand Advanced settings (or your assistant’s equivalent) and enter
HumanListeningMCPas the OAuth Client ID before you save. - Connect - Sign in and choose Allow. It should go through this time.
Your assistant asks for a client secret or other extra fields
Section titled “Your assistant asks for a client secret or other extra fields”You’ve most likely landed in a third-party inference or gateway configuration instead of the standard connector setup. That path asks for extra fields, such as credential kind or gateway base URL, that don’t apply to a HumanListening connection. In Claude, it shows up as “Complete 2 required fields in connection”.
- Back out of the gateway settings - Discard what you’ve entered. Nothing is saved until a connection succeeds, so there’s nothing to clean up.
- Find the standard connectors screen - It’s usually a separate section in settings, with an option to add a custom connector.
- Talk to your IT admin - If that screen isn’t available, your organization probably routes your assistant through a gateway on purpose. The connection then needs to be set up centrally.
Your assistant connects but can’t find any data
Section titled “Your assistant connects but can’t find any data”Good news: the connection itself is working. MCP isn’t enabled yet on any sub account your login can reach.
- Ask what it can see - In a new chat, ask which sub accounts you have access to. If it lists them but says none have MCP enabled, that confirms it.
- Request access - Ask your HumanListening Account Administrator (an Account Admin or Sub Account Admin) to request MCP from the sub account’s Users tab. See Requesting MCP access. If you’re not sure who that is, ask your Customer Success Manager.
- Test again - Once it’s on, start a new chat and ask again. It can take up to 15 minutes to start working, and you won’t need to reconnect.
Your assistant says you’ve reached your usage limit
Section titled “Your assistant says you’ve reached your usage limit”The sub account has used up its MCP credits for the day or the month. The limit is shared, so other people’s use counts too.
- Check which limit - The message says whether it’s the daily or the monthly limit.
- Wait for the reset - The daily limit resets at midnight UTC and the monthly limit at the start of each month.
- Ask for more - If you hit the limit often, ask your Account Administrator to request more allowance with Purchase more on the sub account’s Users tab. See Usage limits.
The export download link doesn’t work
Section titled “The export download link doesn’t work”Export links work once and expire after 5 minutes. If you’ve already used the link, or it’s been more than 5 minutes, ask your assistant to export the data again for a fresh one.