

Export Data: Download a Data Store as a File
Need your data somewhere else? Exporting turns a data store into a file: a CSV for a colleague, an SPSS file for deeper stats, an Excel workbook for a client. You choose the variables, the dates, the format and where the file goes.
Exports run in the background, so you can carry on working. When your file is ready, you collect it from the Exports page (or find it waiting in File Bank).
Start an export
Section titled “Start an export”You start an export from the Data Wrangler home.
- Find your data store - On the Data Wrangler home, hover over the data store’s row.
- Click More → Export Data - The full-screen File Export window opens, with your data store’s name at the top.
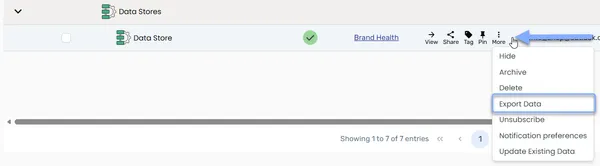
- Work through the steps - Move between steps with next and back. The steps are Variables, Dates, Format, Filtering and Output. You’ll only see Dates if the data store has date variables, and Filtering only for survey data stores.
You’ll also find the File Export window in other apps, such as Export Data Store in Text Explorer. It works the same way wherever you open it.
Step 1: Variables
Section titled “Step 1: Variables”“Select the variables you would like to include in your export and drag them into the ‘Selected Variables’ drop zone.”
- Pick your variables - Drag variables from Available Variables into Selected Variables, or use Select All. Use the search and filter to find them quickly.
- Put them in order - Drag variables within Selected Variables to set the column order in your file.
You need at least one variable, and you can export up to 4,096 variables at once. Variables that are excluded from exports for personal-information reasons don’t appear in the list. See What happens to personal information.
Step 2: Dates
Section titled “Step 2: Dates”“Choose the time period you wish to include in your export.” This step appears when your data store has date variables.
- To export every record, tick Export All Dates.
- To export a date range, leave it unticked:
- Choose the Date Filter Variable to filter on. For survey data, this starts on the survey’s end date.
- Set Date From and Date To. Choose Custom to pick exact dates, or one of the presets: Yesterday, Today, Start Of Last Week, Start Of This Week, Start Of Last Month, Start Of This Month, Start Of Last Year or Start Of This Year. Both start on Yesterday.
Step 3: Format
Section titled “Step 3: Format”“Configure your export format.” Choose an Export Format:
| Format | Good for |
|---|---|
| CSV | The all-rounder. Opens almost anywhere. This is the default. |
| XLSX | Excel workbooks |
| SPSS | Statistical analysis in SPSS (.sav) |
| Quick Report | A quick summary output |
| TSV (tab-separated) | Tab-delimited text |
| PSV (pipe-separated) | Pipe-delimited text |
| JSON | Feeding data into other systems |
| XML | Feeding data into other systems |
Then set the options:
| Option | What it does | Default |
|---|---|---|
| Export Mode | Keys exports the stored codes (1). Labels exports what they mean (“Very satisfied”). Not shown for SPSS. | Labels |
| Column Headers | Uses the Variable Label, Variable Name, or Variable Name and Label as each column’s heading. Not shown for SPSS. | Variable Name |
| Prefix Question Label with Code | SPSS only. | On |
| Remove prefixes from system variables | Tidies the names of system variables. | On |
| Compress File | Zips the file. Not available for XLSX. | On |
| Output Date variables as Strings | Exports dates as plain text. | Off |
| Password protect file | Adds a password. Available for XLSX, or for other formats when Compress File is on. | Off |
| Output Data Variables | XLSX only. | Off |
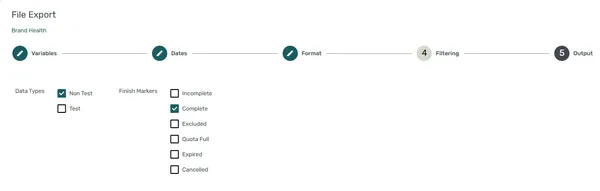
Step 4: Filtering (survey data stores only)
Section titled “Step 4: Filtering (survey data stores only)”Choose which survey responses to include.
- Data Types: Non Test (ticked by default) and Test. Tick both to export every response.
- Finish Markers: Incomplete, Complete, Excluded, Quota Full, Expired and Cancelled. Only Complete is ticked by default. Your survey’s settings may limit which markers you see.
You need at least one of each.
Step 5: Output
Section titled “Step 5: Output”“Prepare your output file.”
- Name the file - Type a file name. The default is “Export” followed by the date and time.
- Choose where it goes - Tick one or more destinations:
- Direct download: collect the file from the Exports page. This is ticked by default.
- Save to FileBank: choose a FileBank Folder.
- Save to SFTP: enter the SFTP Host Name, SFTP Host Port (22 by default), SFTP Username, SFTP Password and SFTP Path.
- Save to Evolved Analytics: only shown if your account uses Evolved Analytics. It isn’t available for SPSS or compressed files.
- Click Export - You’ll see “Export Request Submitted”. Click OK to go to the Exports page.
Get your file from the Exports page
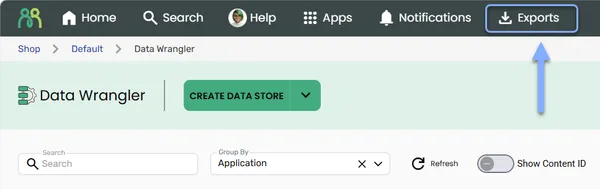
Section titled “Get your file from the Exports page”Click Exports in the header bar to see your exports. You’ll only see exports you requested in the current sub account.
| Status | What it means |
|---|---|
| Queued | Waiting to start |
| Running… | Being created now |
| Finished | Ready |
| Failed | Something went wrong. Try again, or see Common Issues. |
The page doesn’t update by itself. Click Refresh Page to check on progress. To find an export, use Search, or narrow the list with Time Period: Any Time, Last Hour, Last 24 Hours, Last 7 Days, Last 30 Days or Last Year.
When an export is Finished:
- Click Download to download a direct-download export.
- Click File Bank to open the File Bank folder for an export saved there.
To remove an export from the list, click Delete, then YES. You can’t delete an export while it’s running.
What happens to personal information
Section titled “What happens to personal information”How a variable is treated for personal information changes what ends up in your file. See Personal information.
| Treatment | In your export |
|---|---|
| Mask | The real values are exported. Masking only hides values on screen. |
| Wipe or Mask + retention (once erased) | The column is included, but the erased values are blank. |
| Exclude this field from exports and AI/MCP access | The variable is left out of the export completely. |
Frequently Asked Questions
Section titled “Frequently Asked Questions”Where’s my export?
Exports run in the background. Click Exports in the header bar, then Refresh Page until the status is Finished. If you chose Save to FileBank, the file is also in the File Bank folder you picked.
Why is my CSV a ZIP file?
Compress File is on by default. Untick it on the Format step to get a plain CSV.
Should I export Keys or Labels?
Choose Labels (the default) for files people will read, like “Very satisfied”. Choose Keys for files going into stats tools or other systems that expect the stored codes, like 1.
How many variables can I export?
Up to 4,096 at once.
Can I send an export to more than one place?
Yes. Tick as many destinations as you need on the Output step, for example Direct download and Save to FileBank.
Why are some variables missing from the export list?
Variables marked Exclude this field from exports and AI/MCP access don’t appear. See Personal information.
Can I export from the data store page?
Not at the moment. Start exports from the More menu on the Data Wrangler home.
Can I run the same export regularly?
Yes. Save your settings as an export definition, then schedule it. See Saved & scheduled exports.
Common Issues and Solutions
Section titled “Common Issues and Solutions”The Export button won’t work
Section titled “The Export button won’t work”Your settings aren’t complete yet. A message under the window tells you what’s missing:
- “You must select at least one variable”
- “You have exceeded the 4,096 column limit”
- “You must select at least one output destination”
- “You must select a FileBank folder”
- “You must provide a password”
- “You must provide dates”, “You must provide a Custom Export From Date” or “You must provide a Custom Export To Date”
- “You must select at least one finish marker” or “You must select at least one data type marker”
- Read the message - It names the step that needs attention.
- Go back and fix it - Click back to reach that step, complete it, then click Export again.
My export says Failed
Section titled “My export says Failed”The Exports page shows that an export failed, but not why.
- Check your choices - If you filtered by a date variable that’s excluded or wiped for personal-information reasons, choose a different Date Filter Variable.
- Try again - Run the export again from the Data Wrangler home.
- Contact support - If it keeps failing, contact support through Help in the header bar. Include the Export ID from the Exports page, and the data store’s name and GUID (copy it from the data store’s Settings).
”Error downloading file”
Section titled “”Error downloading file””The file couldn’t be downloaded.
- Try again - Click Download again.
- Check you requested it - You can only download exports you requested yourself.
- Contact support - If it keeps happening, contact support with the Export ID, and the data store’s name and GUID (copy it from the data store’s Settings).
”’…’ excluded from export due to PII handling.”
Section titled “”’…’ excluded from export due to PII handling.””You loaded a saved export definition that includes a variable now excluded from exports.
- Carry on without it - The variable is left out of the export.
- Update the definition - Save the definition again so the message doesn’t come back. See Saved & scheduled exports.