

Share explorations
You can share your explorations with other users in your organization. Sharing is done at the workspace level, meaning when you share a workspace, all explorations within it become accessible to the people you share with.
Sharing a workspace
Section titled “Sharing a workspace”To share a workspace:
- Open Data Explorer
- Click the ellipsis menu (three dots) next to your workspace name
- Select Share
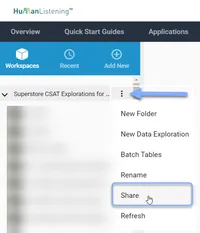
- Add the users you want to share with
- Set their permission level
- Click Save
Permission levels
Section titled “Permission levels”When sharing a workspace, you can grant two levels of access:
| Permission | Description |
|---|---|
| Can Edit | Users can view and modify explorations. This is the default setting. |
| Can Read | Users can only view explorations in View mode. They cannot switch to Edit mode or make changes. |
Exporting explorations
Section titled “Exporting explorations”To share explorations with people outside the HumanListening platform, you can export them to downloadable files. Data tables export to Excel format, while charts export as PNG images.
Exporting a single exploration
Section titled “Exporting a single exploration”The export method depends on whether you’re in Edit mode or View mode.
From View mode:
- Open the exploration you want to export
- Click the Export to Excel button (for tables) or Export to PNG button (for charts)
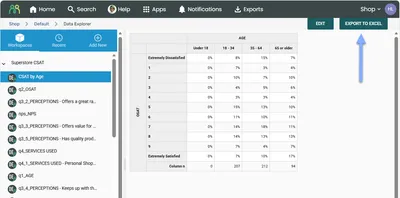
- The file will download to your computer
From Edit mode:
- Open the exploration you want to export
- Click the ellipsis menu in the floating toolbar
- Select Export from the menu
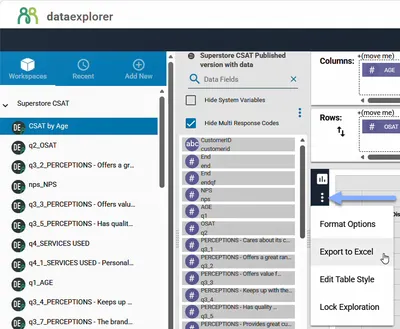
- The file will download to your computer
Exporting an entire workspace
Section titled “Exporting an entire workspace”You can export all explorations in a workspace at once.
- Click the ellipsis menu next to your workspace name in the navigator
- Select Export from the menu
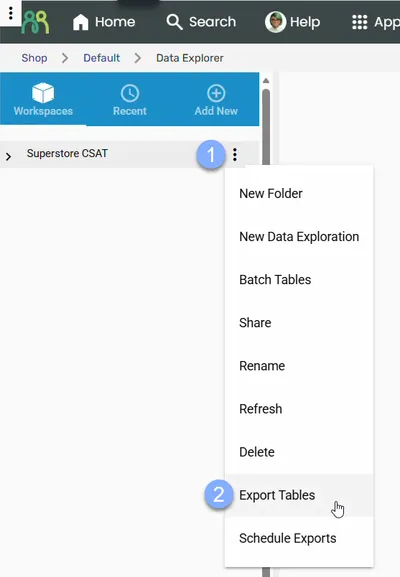
- All explorations in the workspace will be exported
Scheduled exports
Section titled “Scheduled exports”You can set up automated recurring exports to receive regular updates from your explorations without manual intervention. Scheduled exports can be configured at the workspace or folder level.
Creating a scheduled export
Section titled “Creating a scheduled export”- Click the ellipsis menu next to your workspace or folder name
- Select Schedule Exports
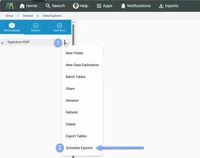
- If the workspace or folder already has schedules, Manage Scheduled Table Exports opens. Next to Create new Scheduled Export, click Next
- Enter a name for your scheduled export
- Select the export frequency:
- Daily - Exports run every day
- Weekly - Exports run once per week
- Monthly - Exports run once per month
- Yearly - Exports run once per year
- Set the start date (Start) and the time of day (At), in your own time zone
- Optionally set an end for the schedule (End): On This Day or After a number of runs
- Click Save
Managing scheduled exports
Section titled “Managing scheduled exports”Once a scheduled export has been set up, choose Schedule Exports again to open Manage Scheduled Table Exports. There you can:
- Disable/Enable - Click Disable to pause a schedule without deleting it, or Enable to start it again
- Edit - Modify the schedule frequency, time, or dates
- Rename - Click on the schedule name to edit it inline
- Delete - Remove a scheduled export permanently
Frequently asked questions
Section titled “Frequently asked questions”Can I share individual explorations instead of the whole workspace?
No, sharing is done at the workspace level. When you share a workspace, all explorations within it become accessible to the shared users. If you need to share only specific explorations, consider creating a separate workspace for those explorations.
What happens when someone with read-only access tries to edit?
Users with Can Read permission can only view explorations in View mode. The Edit button is not available to them, so they cannot modify the exploration, change variables, or alter format options.
Can I see who has access to my workspace?
Yes, click the ellipsis menu next to your workspace name and select Share to open the sharing dialog. This displays all users who currently have access to the workspace and their permission levels.
Who can lock and unlock explorations?
Only the workspace owner or the person who created the exploration can lock or unlock it. If you need to unlock an exploration you didn’t create, contact the workspace owner.
Can people I share with see my data?
Users you share with can only see data from data stores they also have access to. If a shared user doesn’t have access to the underlying data store, they won’t be able to view the exploration results.
Can I export charts as images?
Yes, when your exploration is displayed as a chart, you can export it as a PNG image file. When displayed as a data table, you can export to Excel format.
How do I remove someone’s access to my workspace?
Open the sharing dialog by clicking the ellipsis menu next to your workspace name and selecting Share. Find the user you want to remove and delete their access, then save your changes.
Can I pause a scheduled export without deleting it?
Yes, click Disable on the schedule in the Manage Scheduled Table Exports dialog to pause it. The schedule configuration is preserved and can be re-enabled at any time.
Why can’t I edit a scheduled export?
Only the person who created a scheduled export can edit or delete it. If you need to modify a schedule you didn’t create, contact the person who set it up.
What happens if my scheduled export fails?
If a scheduled export fails to run (for example, due to system issues), the schedule remains active and will attempt to run at the next scheduled time. Check your export queue for any pending or failed exports.
Common issues and solutions
Section titled “Common issues and solutions””Someone I shared with can’t see the data”
Section titled “”Someone I shared with can’t see the data””Users need access to both the workspace and the underlying data store.
- Verify workspace sharing - Check that you’ve added them to the workspace sharing list
- Check data store access - Contact your administrator to ensure they have access to the data store
- Confirm the right account - Make sure they’re logging into the correct account and sub account
”My scheduled export didn’t run”
Section titled “”My scheduled export didn’t run””Scheduled exports can fail for several reasons.
- Check the schedule status - Open Manage Scheduled Table Exports to verify the schedule is enabled
- Review the timing - Confirm the start date has passed and end date (if set) hasn’t been reached
- Check the export queue - Look for failed or pending exports in your queue
”The schedule changed while it was being edited. Reload it and try again.”
Section titled “”The schedule changed while it was being edited. Reload it and try again.””Someone saved the same schedule after you opened it, for example in another browser tab. Your changes weren’t saved.
- Refresh the page - Then open the schedule again with Edit to see the latest saved version
- Make your change again - And click Save
”This schedule has an overdue pending export. Resolve that run before changing its timing.”
Section titled “”This schedule has an overdue pending export. Resolve that run before changing its timing.””An earlier export from this schedule is still waiting to run, so you can’t change the schedule’s timing (its time, days, start or end) yet.
- Wait for the export to run - Then try your change again
- Contact support - If the message doesn’t go away, contact support with the workspace and schedule name
”My export is missing some data”
Section titled “”My export is missing some data””Exports capture the current view of your exploration.
- Check your filters - Active filters limit what data is included in exports
- Verify format options - Only enabled format options (Count, Column %, etc.) appear in exports
- Review hidden categories - If you’ve hidden empty categories, they won’t appear in the export