

Getting started with HumanListening
What is HumanListening?
Section titled “What is HumanListening?”HumanListening is an enterprise insights platform that helps you connect with customers, employees, and markets through integrated data collection, analysis, and reporting tools. Instead of juggling separate tools for surveys, analytics, and reporting, everything works together in one system.
The complete workflow
Section titled “The complete workflow”HumanListening follows a three-step process with applications that cover your entire insights journey:
- Gather your data
- Survey Shaper: Design and launch online surveys
- EVE Builder: Build AI-powered conversational surveys
- EVE Qual Pro: Run AI-moderated qualitative studies
- Data Wrangler: Import, transform, and prepare data from external sources
- File Bank: Upload, transcribe, and share files
- Find the story in your data
- Data Explorer: Cross-tabulations and statistical testing
- Text Explorer: Advanced text analytics and auto reports
- Focus Words: Classify and quantify qualitative data
- Show off & action your findings
- Dashboard Publisher: Create interactive reports and visualizations
- Action Connect: Turn customer feedback into action plans
- Case Manager: Coordinate case workflows and team collaboration
The Portal ties it all together - it’s where you find, share, and organize everything you create.
Applications integrate automatically, so survey responses flow directly into analysis tools, and results connect seamlessly to reporting dashboards. You don’t need to use every application - simply pick the ones that match your goals.
Understanding account structure
Section titled “Understanding account structure”Every HumanListening subscription starts with one account and its default sub account. Understanding this structure helps you navigate the platform effectively.
Accounts represent your main organizational units - typically your company or primary business entity.
Sub accounts create completely separate workspaces within your main account. This is essential when you’re managing multiple clients or business units where data privacy matters.
Key security features
Section titled “Key security features”- Data cannot cross between sub accounts
- Content in one sub account is invisible to users in another
- Complete access control for sensitive information
- Perfect for agencies managing multiple clients
Use sub accounts when you need ironclad data separation - they’re like having completely separate HumanListening instances under one billing account.
First-time login and account setup
Section titled “First-time login and account setup”Many users first encounter HumanListening when someone shares content with them via email. If this is your first time accessing HumanListening, you’ll need to create an account before you can view shared content.
The shared content registration process
Section titled “The shared content registration process”- Receive email invitation with link to shared content
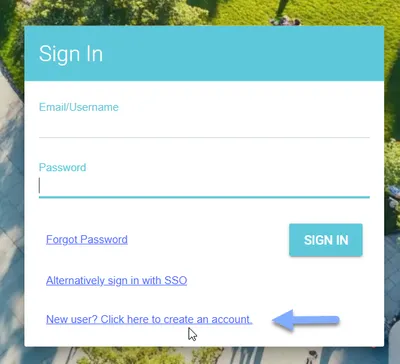
- Click the link - this takes you to the HumanListening login page
- Click “New user? Click here to create an account” if you don’t have an account yet
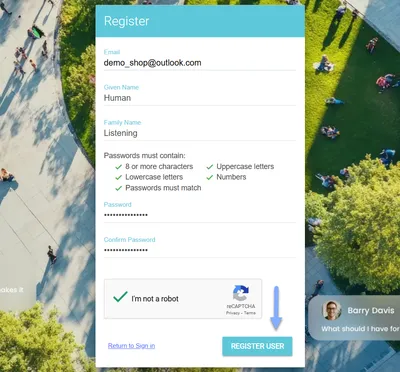
- Enter your name and email address (use the same email that received the invitation)
- Set your password and check the human verification box
- Click Register User
- Check your email for account verification message
- Click the verification link to activate your account
- Return to the original shared content link and login to access what was shared with you
Account verification details
Section titled “Account verification details”Email verification:
- Verification emails usually arrive within minutes
- Check spam folders if you don’t see the verification email
- You must verify your account before accessing any shared content
- Verification links expire after a set time to keep your account secure
Common issues:
- If verification fails or the link has expired, contact the person who shared content with you or our support team
- Ensure you’re using the exact email address that received the original invitation
Account selection experience
Section titled “Account selection experience”Your login experience depends on how many accounts and sub accounts you have access to:
Single account and sub account: You go straight to the portal home - no selection needed.
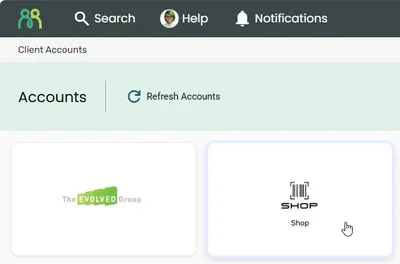
Multiple accounts or sub accounts:
- On the Accounts page, click the tile for the account you want to work in.
- On the Sub Accounts page, click the sub account you want to work in. If the account only has one sub account, this step is skipped.
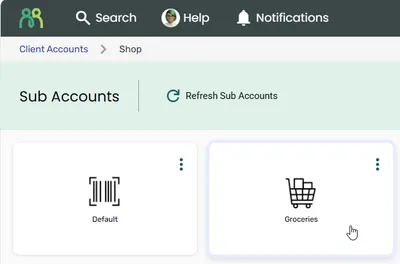
Use the search box in the header to filter the tiles, or click Refresh Accounts / Refresh Sub Accounts if a newly added account isn’t showing yet.
If you see “Oh no! We couldn’t find an account linked to you just yet”, your login isn’t linked to any account. Contact support or the person who invited you.
Portal home
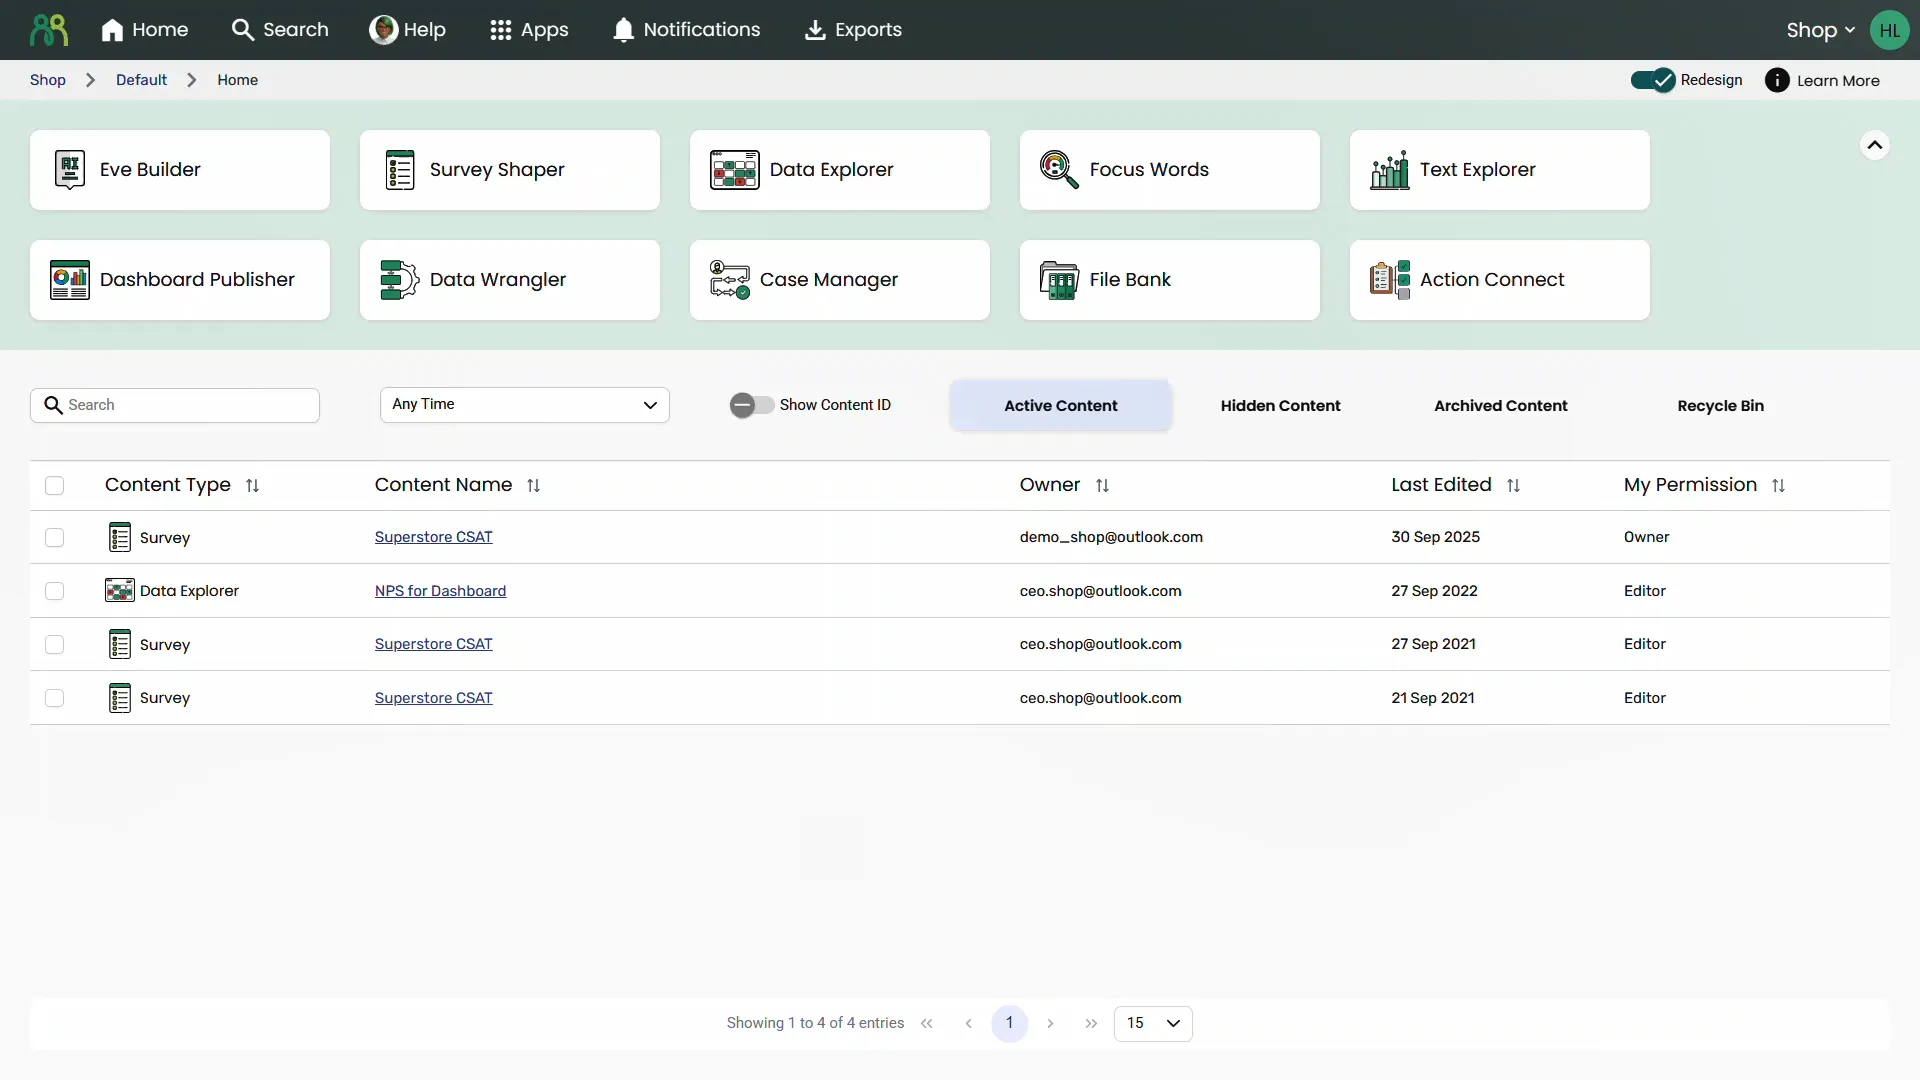
Section titled “Portal home”When you log into HumanListening, you land on the Home screen. This is your central command center where you can:
- Access all applications through the application grid
- Find your existing content in the content table
- Search across everything you have access to
- Switch between accounts or sub accounts if you work with multiple organizations
- Share, tag, pin, rename, duplicate, hide, archive, delete and restore content
First-time experience
Section titled “First-time experience”Your portal home experience depends on whether you’re starting fresh or have existing content:
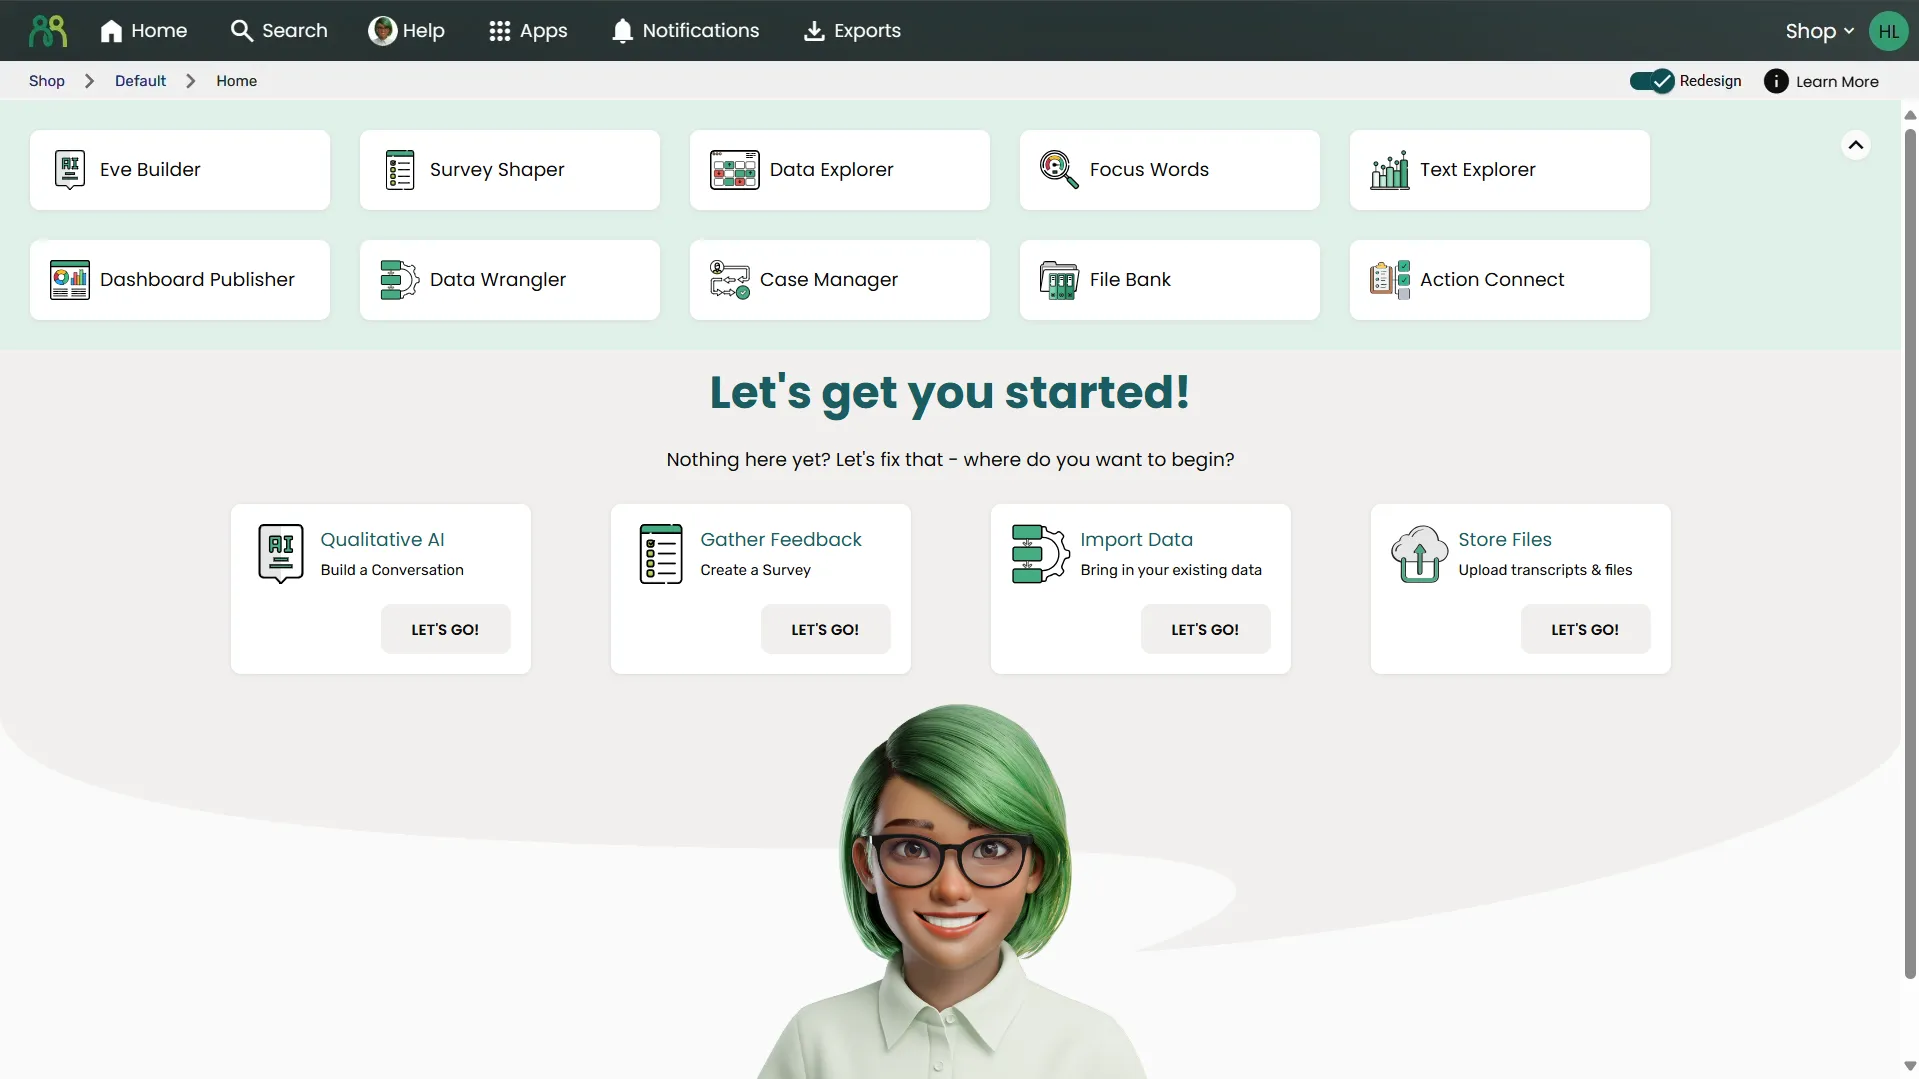
Starting fresh: If you don’t have any content yet, the content table is replaced by Let’s get you started! Click Let’s Go! on one of the suggested starting points:
- Qualitative AI - Build a Conversation (EVE Builder)
- Gather Feedback - Create a Survey (Survey Shaper)
- Import Data - Bring in your existing data (Data Wrangler)
- Store Files - Upload transcripts & files (File Bank)
You only see the starting points for applications you have a license for. You can also click any application in the grid directly.
No application license yet: If you don’t have any application licenses, you’ll see a Contact Admin card instead. Click Request Access to ask for a license - your sub account owner can assign one to you. You can still open anything that’s been shared with you.
Shared access: If you see items in the content table, someone has already shared content with you. Click on any content name in the table to open it.
Portal navigation
Section titled “Portal navigation”Header navigation
Section titled “Header navigation”The header stays the same across all applications and provides essential navigation tools.
Left side navigation:
- HumanListening logo - Click to return to portal home
- Home - Click to return to portal home
- Search - Find content and accounts across HumanListening
- Help - Open Help & Support for documentation, support requests and release notes
- Apps - Quick access to all applications
- Notifications - See alerts about your exports, imports, processing and shared work. See Notifications and exports
- Exports - Download file exports created in the current sub account. See Notifications and exports
Home, Apps and Exports appear once you’ve selected a sub account.
Right side controls:
- Account name - Shows which account you’re currently in - click to open the Account Switcher
- User avatar - Your user menu: theme, profile, password, notification preferences, and account management if you’re an administrator
Your user menu
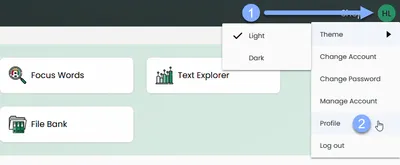
Section titled “Your user menu”Click your avatar in the top-right corner to open your user menu:
- Theme - Switch between Light and Dark
- Change Account - Return to the Accounts page to pick a different account
- Change Password - Change your password (not shown for single sign-on users)
- Notification preferences - Choose how you receive each type of notification. See Notifications and exports
- Manage Account - Account administrators only. See Managing accounts
- Manage Sub Account - Sub account administrators only
- Profile - Update your name, avatar and localisation settings
- Log out - Sign out of HumanListening
The new Portal design
Section titled “The new Portal design”The Portal has a refreshed design, which is turned on for everyone by default. These help pages describe the refreshed design.
Below the header, on the right, you’ll see:
- Redesign - a toggle that switches the refreshed design on or off. Turning it off shows the classic Portal layout, which these help pages don’t cover.
- Learn More - opens the Refreshed Portal overview, which explains what’s changed
Your choice is remembered in your browser.
Finding your current location
Section titled “Finding your current location”No matter which application you’re using or where you are in HumanListening, you can always see your current account and sub account context. Two visual cues help you stay oriented:
Account context: Look at the top-right corner where the current account name appears in the header.

Breadcrumb navigation: Follow the path showing your location in the format: Account Name → Sub Account Name → Current Page. On portal home, the last step is Home.

Breadcrumb navigation
Section titled “Breadcrumb navigation”The breadcrumb navigation appears as a clickable path near the top of every page, showing your current location within HumanListening’s hierarchical structure.

How breadcrumbs work
Section titled “How breadcrumbs work”Visual path: Breadcrumbs display your location as a series of linked elements separated by arrows, like: Account Name → Sub Account Name → Application → Current Page
Clickable navigation: Each element in the path is clickable, allowing you to jump back to any previous level without using the browser’s back button.
Context awareness: Breadcrumbs always reflect your current account and sub account context, helping you stay oriented when working across multiple workspaces.
When breadcrumbs are most helpful
Section titled “When breadcrumbs are most helpful”- Deep navigation: When you’re several levels deep in an application, breadcrumbs provide a quick way back to higher levels
- Multi-workspace work: When switching between different accounts or sub accounts frequently, breadcrumbs help confirm your current location
- Shared links: If you follow a shared link to specific content, breadcrumbs show you exactly where that content lives within the platform structure
Switching between accounts and sub accounts
Section titled “Switching between accounts and sub accounts”You have three ways to switch contexts - use whichever feels most natural.
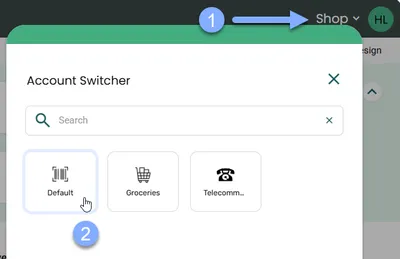
Method 1: Account Switcher
- Click the account name in the header
- Select the sub account you want from the Account Switcher
Method 2: Breadcrumb navigation
- Click the account name in the breadcrumb to see that account’s sub accounts
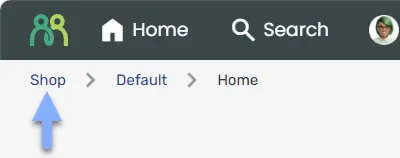
- Click the sub account you want. To pick a different account instead, click Client Accounts in the breadcrumb on that page.
If the account only has one sub account, clicking the account name takes you straight into it.
Method 3: User menu
- Click your avatar in the top-right corner
- Select Change Account to return to the Accounts page
- Select the account and sub account you want
Application grid
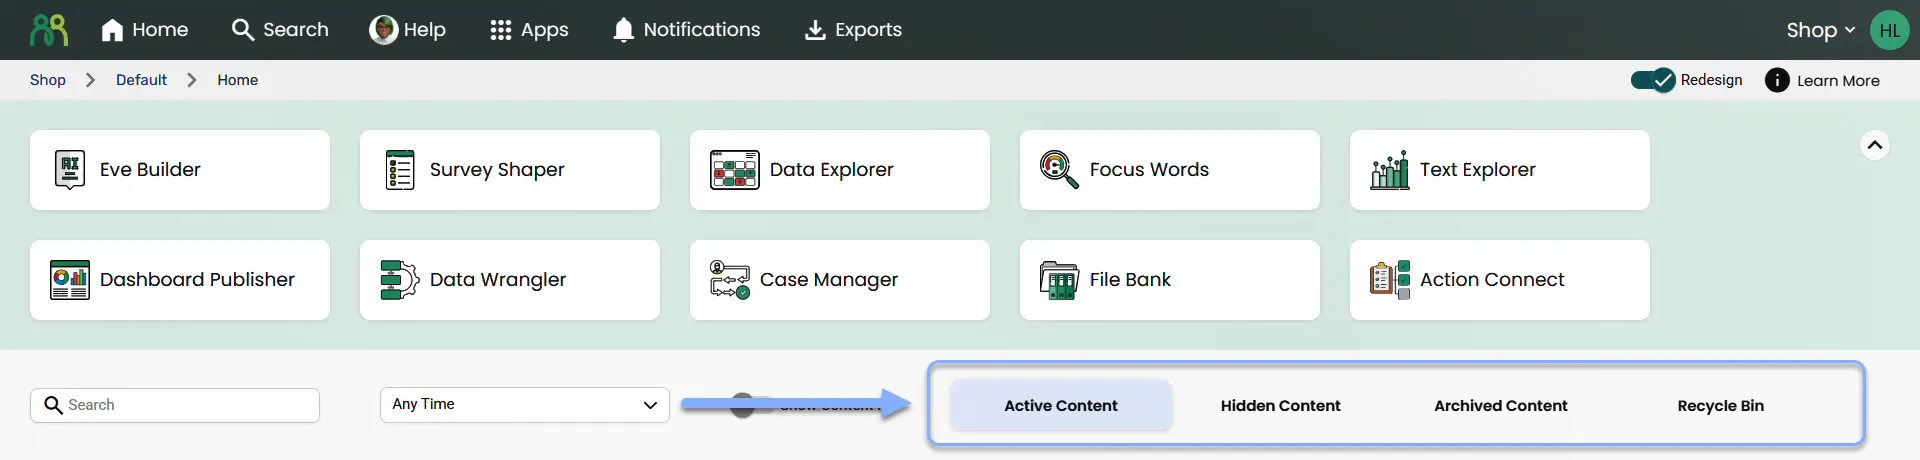
Section titled “Application grid”The application grid at the top of your portal home shows the HumanListening applications as cards. By default, the application grid is expanded when you first visit portal home.

How application access works
Section titled “How application access works”Click and go: Click any application card to launch that tool. Hover over a card to see a short description of what it does.
Locked applications: Applications you don’t have a license for, or that aren’t enabled in the current sub account, show as locked. Hover over a locked card to see why, and contact your administrator if you need access.
Seamless navigation: Once inside an application, use the breadcrumb navigation or the Home button to return to portal home and access other tools.
Managing grid display
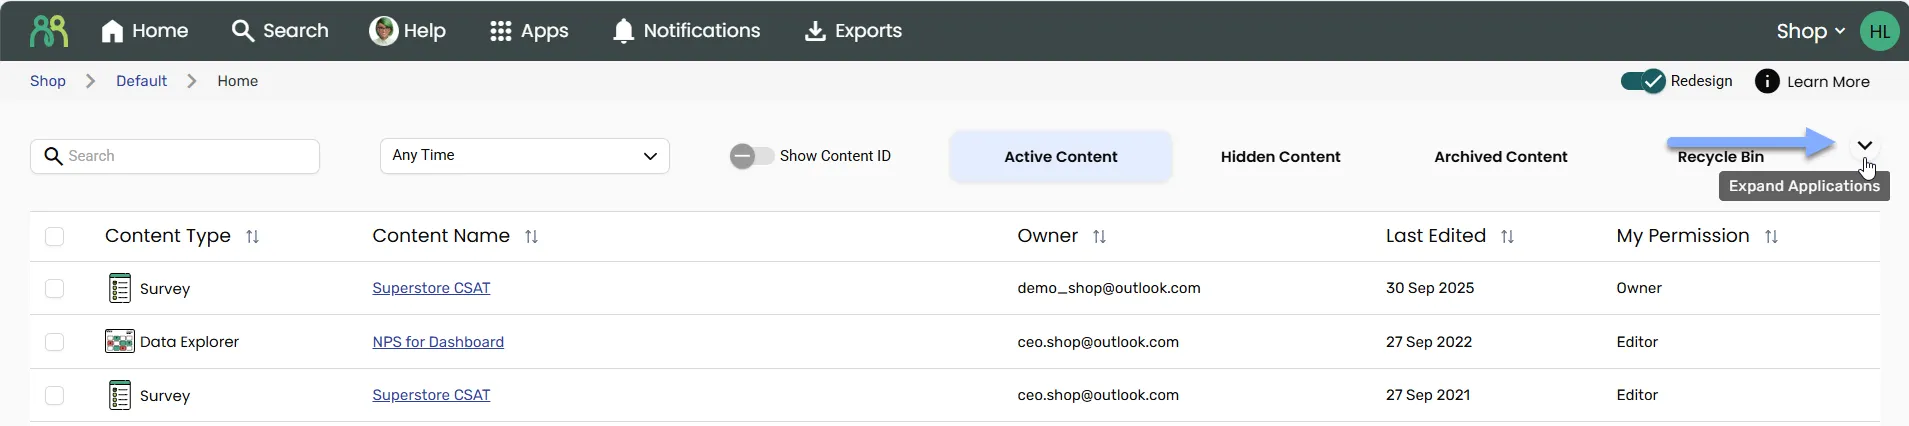
Section titled “Managing grid display”Expand/collapse control: Use the arrow control (Collapse Applications / Expand Applications) to hide or show the grid. This gives your content table more room when you don’t need to launch applications. HumanListening remembers your choice in this browser.
Collapsed state: When collapsed, the application cards are hidden and you see more of your content table. Click the arrow to expand and view applications again.

Expanded state (default): The full grid displays all applications as cards, ready for quick access.
Application quick access
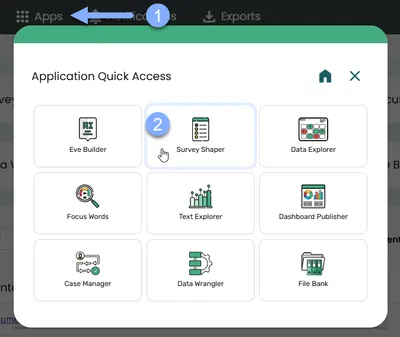
Section titled “Application quick access”You can also open applications from anywhere in HumanListening using the Apps button in the header - even when the application grid is collapsed on portal home.
- Click the Apps button in the header
- Select your target application from the list that appears
Application licenses
Section titled “Application licenses”Application licenses determine which HumanListening tools you can use to create content. Licenses are granted at the account level.
How licenses work:
- Once you receive a license, it generally works in every sub account within the account
- Some applications must also be enabled for each sub account by an administrator - until then they show as locked in that sub account
- The specific applications available depend on your account’s HumanListening subscription plan
- Your account admins allocate these licenses to users who need to create content
Creation vs viewing:
- With license: Create, edit, and share content using available HumanListening applications
- Without license: View content others share with you, but you can’t create new projects
Content table
Section titled “Content table”The content table displays all projects, surveys, dashboards, and other content you have access to across HumanListening applications. Click any content name to open that content directly.
Content information
Section titled “Content information”Columns:
- Content Type: Shows the application icon and content type
- Content Name: Clickable name that opens the content directly
- Content GUID: Hidden unless you turn on Show Content ID - hover over to copy the GUID to your clipboard
- Owner: The email address of the content’s owner - hover over to copy it to your clipboard
- Last Edited: Most recent modification date
- My Permission: Your access level for that item
Refreshing the table: The content table doesn’t update by itself. Click Refresh above the table to load the latest content and permission changes.
Content actions
Section titled “Content actions”Hover over any row in the content table to see the actions for that item.
Quick actions
Section titled “Quick actions”- View: Open the content
- Share: Share content with others (greyed out if you can’t share it)
- Tag: Apply or remove tags
- Pin/Unpin: Add to or remove from your Pinned section
- More (⋮): Open the menu of other actions
More menu
Section titled “More menu”The options in the More menu depend on the content type and your permission. The most common are:
- Edit: Edit the item’s configuration or settings (available for some content types when you have edit access)
- Rename: Change the item’s name (requires edit access)
- Duplicate: Make a copy of the item (requires edit access)
- Hide / Unhide: Hide the content from your active content view only — other users still see it as normal
- Archive / Unarchive: Remove the content from active content for all users, but keep it intact for anything that depends on it (requires edit access)
- Delete: Move the content to the recycle bin for all users (owner only)
- Restore: Bring deleted content back from the recycle bin (requires edit access)
- Permanently Delete: Remove the content from the recycle bin for good (owner only)
- Subscribe / Unsubscribe: Turn notifications for this item on or off. See Notifications and exports
Surveys and data stores also offer View Data and Export Data where your permissions allow.
Understanding hide, archive and delete
Section titled “Understanding hide, archive and delete”Hiding content:
- When to use: If you only have can view access to content you don’t need anymore
- Impact: Hides the content from your active content view only — other users still see it as normal
- Restore: Go to Hidden Content and select Unhide at any time
Archiving content:
- When to use: If you have can edit access to content you no longer need active, but don’t want to disrupt ongoing downstream usage
- Impact: Removes the content from active content for all users, but keeps it intact for anything that depends on it
- Restore: Go to Archived Content and select Unarchive at any time
Deleting content:
- When to use: If you are the owner of content and no longer require it
- Impact: Removes visibility of the content for all users and will affect any downstream usage
- Restore: The content moves to the Recycle Bin, where anyone with edit access can Restore it for up to 30 days before it’s permanently deleted. The owner can also Permanently Delete it straight away.
Bulk actions
Section titled “Bulk actions”When you need to manage multiple content items at once, use bulk actions to save time and effort.
- Select two or more items using the checkboxes in the content table
- Select the action you want from the floating action menu
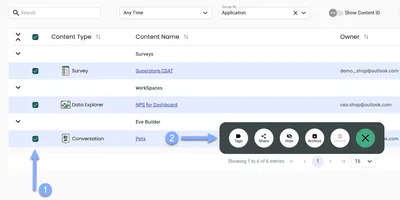
Click the X in the floating menu to cancel - this will deselect all selected content.
Available bulk actions in Active Content:
- Tags - Apply or remove tags from all selected items at once
- Share - Share all selected items at once (not available if your selection includes a dashboard, or an item you can’t share)
- Hide - Hide multiple items from your view
- Archive - Archive multiple items (you need edit access to every selected item)
- Delete - Move multiple items to the recycle bin (you need to own every selected item)
In the other tabs, the floating menu offers the matching actions: Unhide and Delete in Hidden Content, Unarchive and Delete in Archived Content, and Restore in the Recycle Bin.
Items per page and pagination
Section titled “Items per page and pagination”Control how many content items display at once using the items per page selector at the bottom of the content table.
Available options:
- 15 items - Good for quick scanning
- 25 items - Default view
- 50 items - Maximum view for extensive browsing - perfect for large screens
How to change:
- Look at the bottom of the content table
- Click the items per page dropdown (shows active setting - e.g. “25”)
- Select your preferred number from the options
The table updates immediately to show your selected number of items per page.
Pagination controls:
- Use the arrow buttons or page numbers to navigate between pages
- First/Last page buttons (double arrows) jump to the beginning or end
- The display shows your current position: “Showing 1 to 25 of 147 entries”
Show Content ID toggle
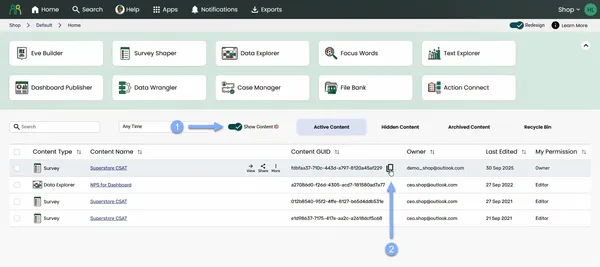
Section titled “Show Content ID toggle”Show Content ID: Use the toggle to show or hide the Content GUID column in your content table. This lets you access unique identifiers for your Portal content when needed, while keeping your table clean during regular work. HumanListening remembers your choice in this browser.
To work with Content IDs:
- Turn on Show Content ID to show the Content GUID column
- Copy GUIDs - Click the copy icon next to any GUID
- Use the identifiers - Share with support teams or use in technical work
Status tabs
Section titled “Status tabs”Filter content by status:
- Active Content: Content currently in use
- Hidden Content: Content you’ve hidden from your main view - others still see it as active
- Archived Content: Finished projects you want to keep but not see daily
- Recycle Bin: Recently deleted content - still recoverable for 30 days
On smaller screens, these tabs appear as a Content Status dropdown.
Finding & organizing content
Section titled “Finding & organizing content”Once you’re comfortable with the basics, the content table becomes your command center for managing all your HumanListening work. Instead of hunting through endless lists, you can:
- Search across all content instantly by keyword, name, owner, content GUID, or tag
- Filter by content type, time period, or status
- Group content by application or custom tag categories
- Pin important items for quick access at the top
- Tag content for flexible, cross-application organization
- Sort and bulk-action to manage multiple items efficiently
These organizational tools help you find exactly what you need and keep your workspace clean - especially important as your content library grows.
Ready to dive deeper? Check out Finding and organizing content for detailed guides on each feature.
User settings and preferences
Section titled “User settings and preferences”Personalize your HumanListening experience through your user menu. Access everything through your avatar in the top-right corner - by default, it shows your initials, but you can customize it with your own image.
Customizing your avatar
Section titled “Customizing your avatar”Your avatar appears throughout HumanListening to identify your content and contributions to team projects.
- Click your avatar in the top-right corner of any page
- Select Profile from the menu
- Click your current avatar on the profile page
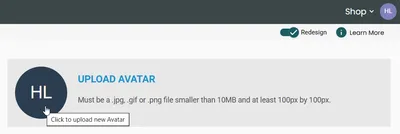
- Choose your image file - it must be a .jpg, .gif or .png file smaller than 10MB and at least 100px by 100px
- Click SAVE CHANGES to update your avatar across the platform
Updating personal information
Section titled “Updating personal information”Keep your contact details current so colleagues can reach you and notifications get delivered properly.
- Click your avatar in the top-right corner of any page
- Select Profile from the menu
- Update the fields you want to change under General:
- First Name and Surname
- Mobile
- Title
- Company
- Adjust the Localisation settings to match your preferences:
- Preferred Language for the interface
- Time Zone for accurate timestamps
- Country for regional formatting
- Click SAVE CHANGES - you’re returned to portal home once your profile is saved
Email address changes
Section titled “Email address changes”For security reasons, you can’t change your email address on the profile page. Contact our support team at support@theevolvedgroup.com if you need to update your email address - they’ll guide you through the verification process to maintain account security.
Password management
Section titled “Password management”Changing your current password
Section titled “Changing your current password”- Click your avatar and select Change Password
- You’re taken to the secure HumanListening sign-in site
- Enter your current password and your new password, then confirm the change
Forgot your password?
Section titled “Forgot your password?”Reset your password through the login page if you can’t remember your current one:
- Go to the HumanListening sign-in page
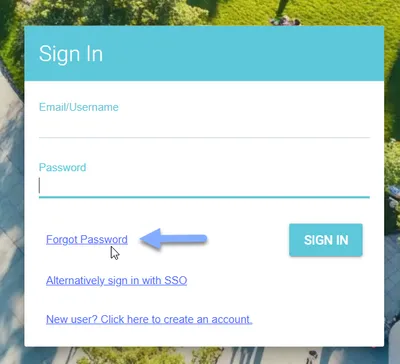
- Click “Forgot Password” below the password field
- Enter your email address and submit the request
- Check your email for the reset link (usually arrives within minutes)
- Follow the instructions in the email to set a new password
Single sign-on (SSO) users
Section titled “Single sign-on (SSO) users”If your organization uses SSO for HumanListening access, you won’t see Change Password in your user menu - password changes are handled through your corporate identity system. Contact your IT administrator for password resets or email address changes - the standard HumanListening reset process won’t work for SSO accounts.
Theme preferences
Section titled “Theme preferences”HumanListening supports both light and dark interface themes to match your working preferences and reduce eye strain during long analysis sessions.
Switching between themes
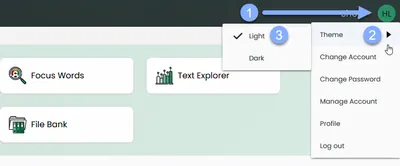
Section titled “Switching between themes”- Click your avatar in the top-right corner
- Point to Theme in the menu
- Select Light or Dark
Theme options
Section titled “Theme options”Light mode (default): Clean, bright interface with dark text on light backgrounds. Best for well-lit environments and users who prefer traditional interface styling.
Dark mode: Dark backgrounds with light text and interface elements. Reduces eye strain in low-light conditions and can help conserve battery on devices with OLED screens.
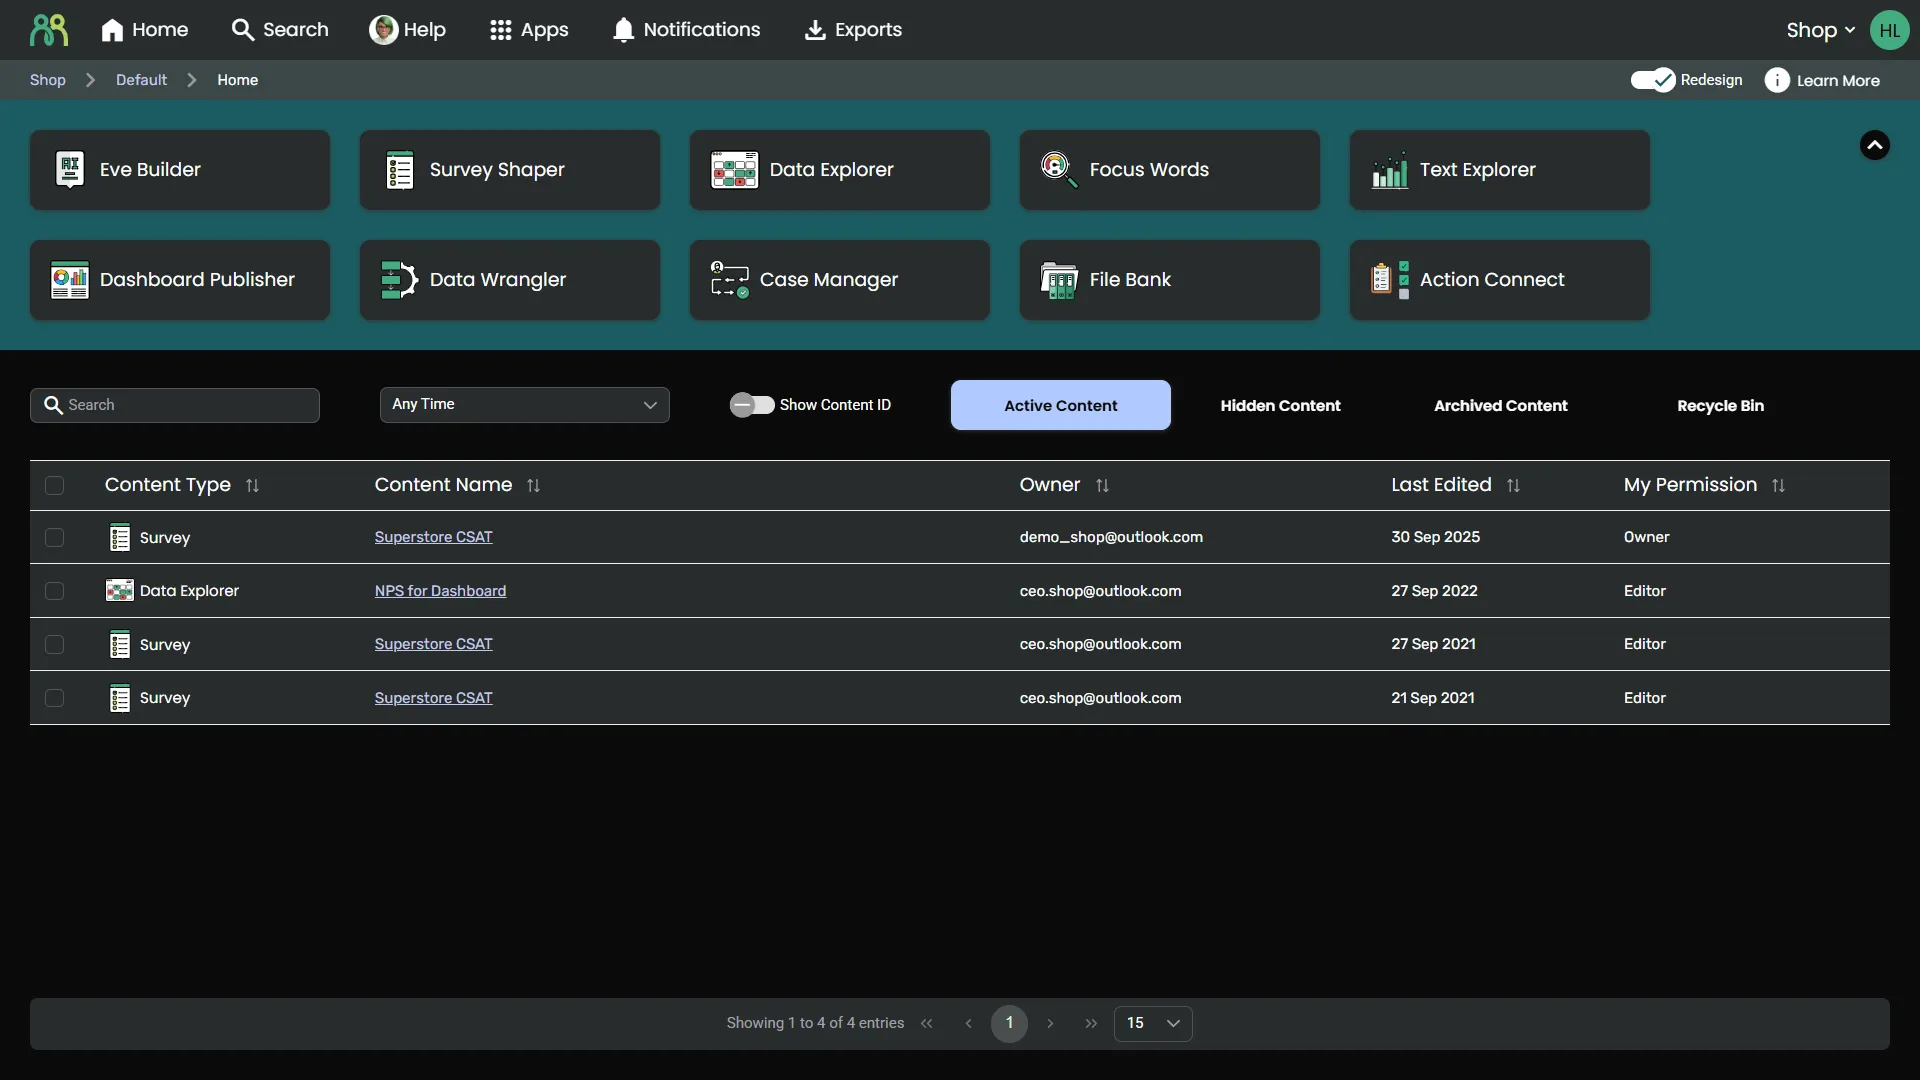
Your theme applies to all HumanListening applications and is remembered in this browser. If you use HumanListening on another browser or device, set it there too.
Getting help
Section titled “Getting help”Click Help in the header to open Help & Support. It has three tabs:
- Documentation - Browse these help pages without leaving HumanListening
- Support - Contact our team
- Release Notes - See what’s new in the latest release
To contact support:
- Click Help in the header
- Click the Support tab
- Choose the option that fits your request:
- Report an Issue - Report bugs, technical problems, or platform errors
- Request Training - Schedule training sessions or request educational resources
- Technical Support - Get help with technical questions and troubleshooting
- Suggestions & Ideas - Share feedback, feature requests, and improvement ideas
- Fill in the support form that opens in a new tab and submit it
Include specific details about what you’re trying to do and any error messages you’re seeing.
Frequently asked questions
Section titled “Frequently asked questions”Account and navigation
Section titled “Account and navigation”How do I know which account or sub account I’m currently in?
Check the account name in the top-right corner of the header, or look at the breadcrumb path showing Account → Sub Account → Current Page.
Can I see content from other sub accounts?
No - sub accounts are completely separate for security. You can only see content from sub accounts where you’ve been granted access.
Why are some applications locked?
A locked application means you don’t have a license for it, or it hasn’t been enabled in the sub account you’re in. Hover over the locked card to see why, and contact your account administrator if you need access.
How do I go back to the classic Portal layout?
Turn off the Redesign toggle below the header on the right. Turn it back on at any time to return to the refreshed design.
User settings and preferences
Section titled “User settings and preferences”Why can’t I change my email address in my profile?
Email addresses are used for account security and login verification. Changes require additional security steps that our support team handles to protect your account.
What image formats work for avatars?
Upload .jpg, .gif, or .png files smaller than 10MB. Images must be at least 100px by 100px.
Will changing my time zone affect existing timestamps?
No - your content keeps its original timestamps. The time zone setting only affects how dates and times are shown to you.
I’m not receiving password reset emails. What should I do?
Check your spam folder first, then verify you’re using the correct email address. If you still don’t receive the email after 15 minutes, contact support.
Technical issues
Section titled “Technical issues”Applications are loading slowly or not at all. What should I do?
Refresh your browser, check your internet connection, clear browser cache, or contact support if problems persist.
I can’t see content that was just shared with me or that I just created. What’s wrong?
Click Refresh above the content table to load the latest content. Also check you’re in the right account and sub account, and that the content isn’t in the Hidden Content or Archived Content tab.